Introduction
With the upcoming Halloween festive season in mind, we are bringing coding tutorials in which we will convert image formats: PNG to JPG, JPG to PNG, and other image formats such as GIFs to PNG, GIFs to JPG, or even JPEG to PNG or JPEG to GIFs, etc.
We power our image converter script with PHP. Because it provides built-in modules that will allow us to achieve maximum results with minimum coding effort.
And as always, we are going to code this project in VS Code editor. Wanna know why? Check this post out.
So without further talks, let’s jump into code. But before that check this demo out to know what our final project looks like:
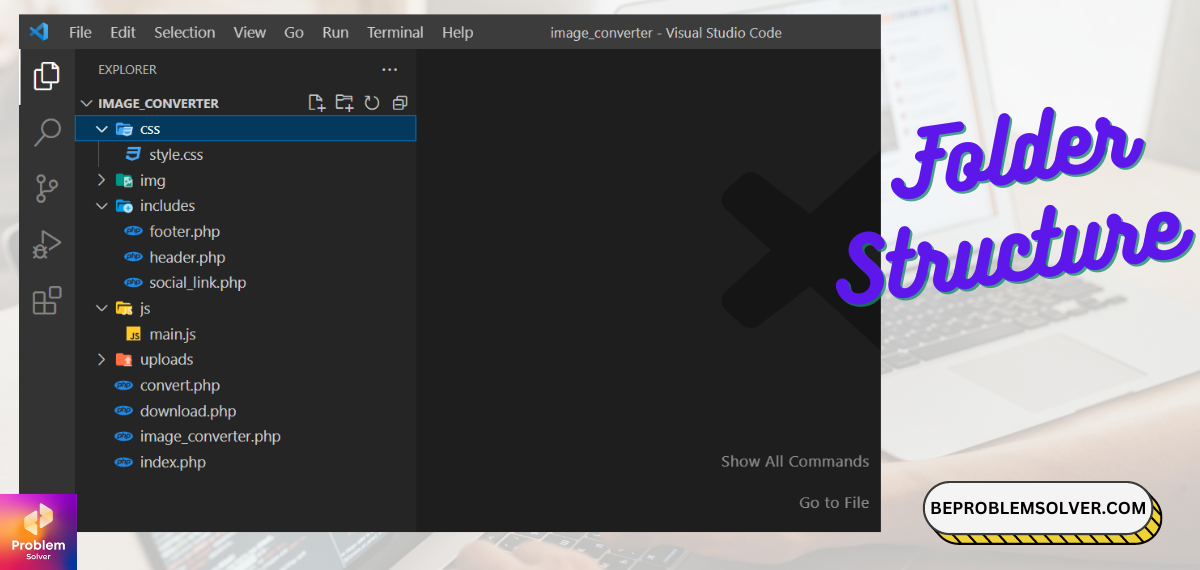
File Structure
Since this project contains multiple files we will define a folder and file structure as well. As usual, we will give you complete details. So the file will be as mentioned in the below picture:

UI of Image Converter
Now that we are aware of all files we need to make, let’s start with the main file “index.php“. And furthermore, we will divide our code for simplicity:
- “header.php“: this file contains only the basic details of the navigation bar of our JPG to PNG image converter. And we will include this file in our “index.php“. With a separate header file, we don’t need to code navigation-related changes to all files. One of the benefits of using a backend language like PHP.
- “footer.php“: Like the header file, our footer content is separated into another file called “footer.php”. For now, we only writing basic code. And loading our vital JavaScript file for Bootstrap 5.
- “social_link.php“: this file is purely for enabling those awesome-looking social icons that you see on all modern websites.
Now let’s see the UI/UX code of our PNG to JPG converter.
“header.php“
<!DOCTYPE html>
<html lang="en">

<head>
	<meta charset="UTF-8">
	<meta http-equiv="X-UA-Compatible" content="IE=edge">
	<meta name="viewport" content="width=device-width, initial-scale=1.0">
	<title>Image Converter | JPG to PNG | JPG to GIF | PNG to JPG | PNG to GIF | GIF to JPG | GIF to PNG | JPEG to PNG | JPEG to GIF</title>
	<meta name="title" content="Image Converter">
	<meta name="description" content="Ads Free Image Converter that allows you to convert any image to JPG, PNG, and GIF. You can convert these and vice versa too. We promise zero ads.">
	<meta name="keywords" content="Image Converter, JPG Converter, PNG Converter, GIF Converter, JPG to PNG, JPG to GIF, PNG to JPG, PNG to GIF, GIF to JPG, GIF to PNG, JPEG to PNG, JPEG to GIF">
	<meta name="robots" content="index, follow">
	<meta http-equiv="Content-Type" content="text/html; charset=utf-8">
	<meta name="language" content="English">
	<meta name="revisit-after" content="7 days">
	<meta name="author" content="Pawan">

	<!-- Favicon -->
	<link rel="apple-touch-icon" sizes="180x180" href="img/apple-touch-icon.png">
	<link rel="icon" type="image/png" sizes="32x32" href="img/favicon-32x32.png">
	<link rel="icon" type="image/png" sizes="16x16" href="img/favicon-16x16.png">

	<!-- Links -->
	<link href="https://cdn.jsdelivr.net/npm/[email protected]/dist/css/bootstrap.min.css" rel="stylesheet">
	<link rel="preconnect" href="https://fonts.googleapis.com">
	<link rel="preconnect" href="https://fonts.gstatic.com" crossorigin>
	<link href="https://fonts.googleapis.com/css2?family=Quicksand&display=swap" rel="stylesheet">
	<link rel="stylesheet" href="css/style.css">
</head>

<body class="d-flex flex-column min-vh-100">
	<nav class="navbar navbar-expand-lg bg-light only-top-navbar">
		<div class="container-fluid">
			<a class="navbar-brand" href="index.php"><img src="img/logo.png" alt="Image Converter Logo"></a>
		</div>
	</nav>
	<br>
Now our main file that first in our browser. Do note down that all our file link back to our main file.
“index.php“
<?php
//import the converter class
require('image_converter.php');

if ($_FILES) {
	$obj = new Image_converter();

	//call upload function and send the $_FILES, target folder and input name
	$upload = $obj->upload_image($_FILES, 'uploads', 'fileToUpload');
	if ($upload) {
		$imageName = urlencode($upload[0]);
		$imageType = urlencode($upload[1]);

		if ($imageType == 'jpeg') {
			$imageType = 'jpg';
		}
		header('Location: convert.php?imageName=' . $imageName . '&imageType=' . $imageType);
	}
}

?>
<?php include("includes/header.php"); ?>

<div class="container pb-4">
	<div class="row">
		<div class="col col-lg-12 col-md-12 col-sm-12">
			<h1 class="text-center h2 fw-bold">Image Converter</h1>
			<h2 class="text-center h4">Convert Any image to JPG, PNG, GIF</h2>
			<br>

			<div class="card text-center mx-auto p-2 gradient-card">
				<div class="card-body">
					<h4 class="card-title h4 fw-bold">Upload and Convert Image of your choice</h4>
					<p class="card-text">JPG to PNG | JPG to GIF | PNG to JPG | PNG to GIF | GIF to JPG | GIF to PNG | JPEG to PNG | JPEG to GIF</p>
				</div>

				<div class="card-body">
					<form action="" enctype="multipart/form-data" method="post" onsubmit="return checkEmpty()">
						<div class="mb-3">
							<label for="fileToUpload" class="form-label">Upload file</label>
							<input type="file" class="form-control" name="fileToUpload" id="fileToUpload">
						</div>
						<button type="submit" class="btn btn-warning btn-lg fw-bold"><i class="fa-solid fa-upload"></i> Upload</button>
					</form>
				</div>
			</div>

		</div>
	</div>

	<?php include_once("includes/social_link.php"); ?>
</div>

<?php include("includes/footer.php"); ?>
Note: Here are some important points to keep in mind when to convert png to jpg or vice versa.
- “image_converter.php“: this is an important file for our project. Hence we have made it require. Unlike “header.php” or “social_link.php”. Why? Read this article about the difference between require() and include function.
- In our image uploading form code, we added “enctype=”multipart/form-data“. This is a compulsory HTML attribute if you want to upload a file in your HTML form. Read more about the Enctype attribute in this MDN guide.
Lastly, we need to code our footer:
“footer.php“
<footer class="bg-dark mt-auto">
	<div class="container-fluid">
		<p class="text-light text-center py-3">@2022 Image Converter || All Right Reserved || <a href="https://beproblemsolver.com">Designed by Be Problem Solver</a></p>
	</div>
</footer>
</body>
<!-- JavaScript Bundle with Popper -->
<script src="https://cdn.jsdelivr.net/npm/[email protected]/dist/js/bootstrap.bundle.min.js"></script>
<script src="https://kit.fontawesome.com/0a82b36f45.js" crossorigin="anonymous"></script>
<script src="js/main.js"></script>

</html>
As you saw, we relied on Bootstrap 5 for major CSS changes. But still, need a tiny bit of custom CSS to make our JPG to PNG converter shine.
“style.css“
/* Author: Pawan */
/* Custom Styles Here */
:root {
  --theme_color_primary: #C197D2;
}

/* Utility */
body {
  background-image: url(../img/bg.jpg);
  background-image: url(../img/bg.svg);
  background-size: cover;
  font-size: 16px;
  position: relative;
  font-family: 'Quicksand', sans-serif;
}

/* Social Icons */
.fa-square-facebook {
  color: #3b5998;
}

.fa-square-twitter {
  color: #00acee;
}

.fa-square-instagram {
  color: #f09433;
}

.social_icons .btn:hover {
  border-color: transparent;
}

/* Navbar */
.only-top-navbar {
  background-color: var(--theme_color_primary) !important;
}

/* Card */
.gradient-card {
  background: linear-gradient(90deg, #C197D2 0%, #f8a8c5 100%);
}

/* Select Element */
.select-box select {
  width: 60%;
  margin: 0 auto;
}

.img-200 {
  height: 200px;
}
We are done with the UI part. Don’t worry you can download images used in this project at our Github Repo. Or feel free to use your images for styling.
Now let’s see what we code into other files to make our JPG to PNG image converter work. But before that wanna learn how to use APIs in your web project or in an app? Check our post!
The logic behind PNG to JPG Image converter
For ease of use and to separate UI from logic we have created the “image_converter.php” file. This file is contains our PHP modules which convert jpg to png or convert png to jpg.
<?php

class Image_converter{

	function convert_image($convert_type, $target_dir, $image_name, $image_quality=100){
		$target_dir = "$target_dir/";

		$image = $target_dir.$image_name;

		$img_name = $this->remove_extension_from_image($image);

		if($convert_type == 'png'){
			$binary = imagecreatefromstring(file_get_contents($image));
			$image_quality = floor(10 - ($image_quality / 10));
			ImagePNG($binary, $target_dir.$img_name.'.'.$convert_type, $image_quality);
			return $img_name.'.'.$convert_type;
		}

		if($convert_type == 'jpg'){
			$binary = imagecreatefromstring(file_get_contents($image));
			imageJpeg($binary, $target_dir.$img_name.'.'.$convert_type, $image_quality);
			return $img_name.'.'.$convert_type;
		}

		if($convert_type == 'gif'){
			$binary = imagecreatefromstring(file_get_contents($image));
			imageGif($binary, $target_dir.$img_name.'.'.$convert_type, $image_quality);
			return $img_name.'.'.$convert_type;
		}
		return false;
	}

	public function upload_image($files, $target_dir, $input_name){

		$target_dir = "$target_dir/";

		$base_name = basename($files[$input_name]["name"]);

		$imageFileType = $this->get_image_type($base_name);

		$new_name = $this->get_dynamic_name($base_name, $imageFileType);

		$target_file = $target_dir . $new_name;

		$validate = $this->validate_image($files[$input_name]["tmp_name"]);
		if(!$validate){
			echo "Doesn't seem like an image file :(";
			return false;
		}

		$file_size = $this->check_file_size($files[$input_name]["size"], 1000000);
		if(!$file_size){
			echo "You cannot upload more than 1MB file";
			return false;
		}

		$file_type = $this->check_only_allowed_image_types($imageFileType);
		if(!$file_type){
			echo "You cannot upload other than JPG, JPEG, GIF and PNG";
			return false;
		}

		if (move_uploaded_file($files[$input_name]["tmp_name"], $target_file)) {
			return array($new_name, $imageFileType);
		} else {
			echo "Sorry, there was an error uploading your file.";
		}

	}

	protected function get_image_type($target_file){
		$imageFileType = pathinfo($target_file,PATHINFO_EXTENSION);
		return $imageFileType;
	}

	protected function validate_image($file){
		$check = getimagesize($file);
		if($check !== false) {
			return true;
		}
		return false;
	}

	protected function check_file_size($file, $size_limit){
		if ($file > $size_limit) {
			return false;
		}
		return true;
	}

	protected function check_only_allowed_image_types($imagetype){
		if($imagetype != "jpg" && $imagetype != "png" && $imagetype != "jpeg" && $imagetype != "gif" ) {
			return false;
		}
		return true;
	}

	protected function get_dynamic_name($basename, $imagetype){
		$only_name = basename($basename, '.'.$imagetype);
		$combine_time = $only_name.'_'.time();
		$new_name = $combine_time.'.'.$imagetype;
		return $new_name;
	}

	protected function remove_extension_from_image($image){
		$extension = $this->get_image_type($image);
		$only_name = basename($image, '.'.$extension);
		return $only_name;
	}
}
?>
Convert Image Format
Now that we understood the logic let’s keep coding to the part where we convert our image format. Or convert png to jpg and convert jpg to png. We can even convert any image format to GIF as well.
“convert.php“
<?php
require('image_converter.php');

$imageType = '';
$download = false;

if ($_GET) {
	$imageType = urldecode($_GET['imageType']);
	$imageName = urldecode($_GET['imageName']);
} else {
	header('Location:index.php');
}

if ($_POST) {

	$convert_type = $_POST['convert_type'];

	$obj = new Image_converter();
	$target_dir = 'uploads';

	$image = $obj->convert_image($convert_type, $target_dir, $imageName);

	if ($image) {
		$download = true;
	}
}

$types = array(
	'png' => 'PNG',
	'jpg' => 'JPG',
	'gif' => 'GIF',
);
?>
<?php include("includes/header.php"); ?>

<div class="container pb-4">
	<div class="row">
		<div class="col col-lg-12 col-md-12 col-sm-12">
			<h2 class="text-center lh-lg fw-bold">Image Converter</h2>
			<h4 class="text-center lh-lg">Convert Any image to JPG, PNG, GIF</h4>
			<p class="text-center card-text">JPG to PNG | JPG to GIF | PNG to JPG | PNG to GIF | GIF to JPG | GIF to PNG | JPEG to PNG | JPEG to GIF</p>

			<div class="card text-center mx-auto p-2 gradient-card">
				<div class="card-body">
					<?php if (!$download) { ?>
						<form method="post" action="">
							<h5 class="py-2 h4 fw-bold">File Uploaded, Select below option to convert!</h5>
							<img src="uploads/<?= $imageName; ?>" class="img-fluid rounded img-200 mb-4">

							<div class="w-50 mb-3 mx-auto">
								<label class="form-label h5 fw-bold">Convert To:</label>
								<select name="convert_type" class="form-control">
									<?php foreach ($types as $key => $type) { ?>
										<?php if ($key != $imageType) { ?>
											<option value="<?= $key; ?>"><?= $type; ?></option>
										<?php } ?>
									<?php } ?>
								</select>
							</div>

							<div class="mb-3">
								<button type="submit" class="btn btn-success btn-lg fw-bold"><i class="fa-solid fa-arrows-rotate"></i> Convert</button>
							</div>
						</form>
					<?php } ?>

					<?php if ($download) { ?>
						<h5 class="py-2 h4 fw-bold"> Converted to <?php echo ucwords($convert_type); ?></h5>
						<img src="<?= $target_dir . '/' . $image; ?>" class="img-fluid rounded img-200 mb-4" />

						<div class="mb-3">
							<a href="download.php?filepath=<?php echo $target_dir . '/' . $image; ?>" class="btn btn-success btn-lg mb-2"><i class="fa-solid fa-download"></i> Download Converted Image</a>
							<a href="index.php" class="btn btn-primary"><i class="fa-solid fa-square-arrow-up-right mb-2"></i> Convert Another</a>
						</div>
					<?php } ?>
				</div>
			</div>

		</div>
	</div>

	<?php include_once("includes/social_link.php"); ?>
</div>

<?php include("includes/footer.php"); ?>
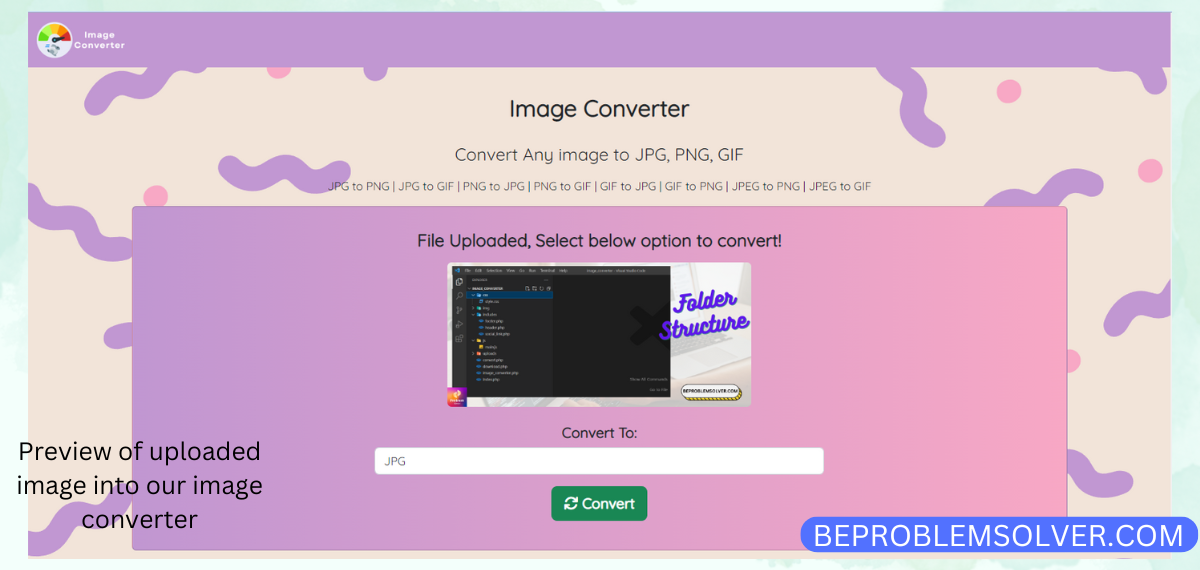
Here is how our image is previewed in image converter:

Download image
Almost to the finish line! Now we only to create a file that will allow us to download our converted file.
“download.php“
<?php

$file_path = $_GET['filepath'];
header('Content-Type: application/octet-stream');
header("Content-Transfer-Encoding: Binary");
header("Content-disposition: attachment; filename=\"" . basename($file_path) . "\"");
readfile($file_path);

?>
Congrats! Now you completely built your own image converter that can convert png to jpg. Or if you desire then convert jpg to png. Or maybe convert them to gifs.
And finally, you can download our JPG to PNG and PNG to JPG image converter files from the below Github Link:
Conclusion
We hope you enjoyed this article about Image Converter scripts for PNG to JPG and JPG to PNG conversion! If you have any questions or concerns about our scripts or any other scripts on our website, please contact us anytime. Or leave a comment below.
Also, check out our previous post where we linked our HTML form to Google Sheets for collecting data. Or read on how to submit a form without any page refresh.
Thank you for reading, we are always excited when one of our posts is able to provide useful information on a topic like this! Keep Reading and coding! Ta-Da!


This design is wicked! You definitely know how to keep a reader entertained.
Between your wit and your videos, I was almost moved to
start my own blog (well, almost…HaHa!) Excellent job.
I really loved what you had to say, and more than that, how you
presented it. Too cool!
Why people still make use of to read news papers when in this technological world everything is presented on net?