Introduction
Are you interested in learning how to use APIs? No worries we will show you the complete API example in today’s article.
The two API examples are:
First – How to use a JSON API example to get weather information for our webpage. You can easily implement it in a mobile app too if need be. I assure you it is easy to do!
The second – we show you how to use our REST API example. Where we will insert, read, update and delete data with API. But before we proceed, check out our post where we explain 6 different methods to achieve knockout page scroll animation on your webpage with minimal coding!
Now let us tackle our first API example:
Use API to Build a Weather Web App
Without any long-winded intro, let me tell you three things we will need to build this Weather App:
- OpenWeatherMap API. It is an amazing free weather API which reliable with weather predictions and gives 1000 free API calls on a single day! Plenty for our beginner project.
- jQuery for making API calls and handling them.
- Bootstrap for quick templating design in HTML and CSS. You can use Tailwind CSS or any other CSS template you prefer.
Step 1: Register
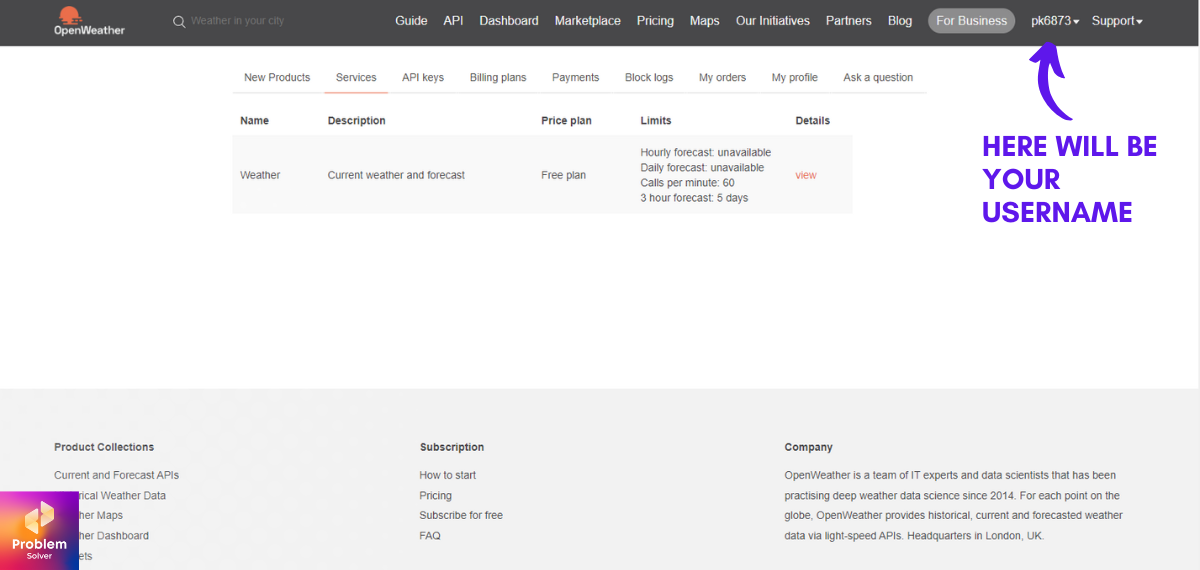
Register at Openweathermap.org for a free account. You need it to generate your personal API Key. After login you will look like this:

Step 2. Generate an API Key
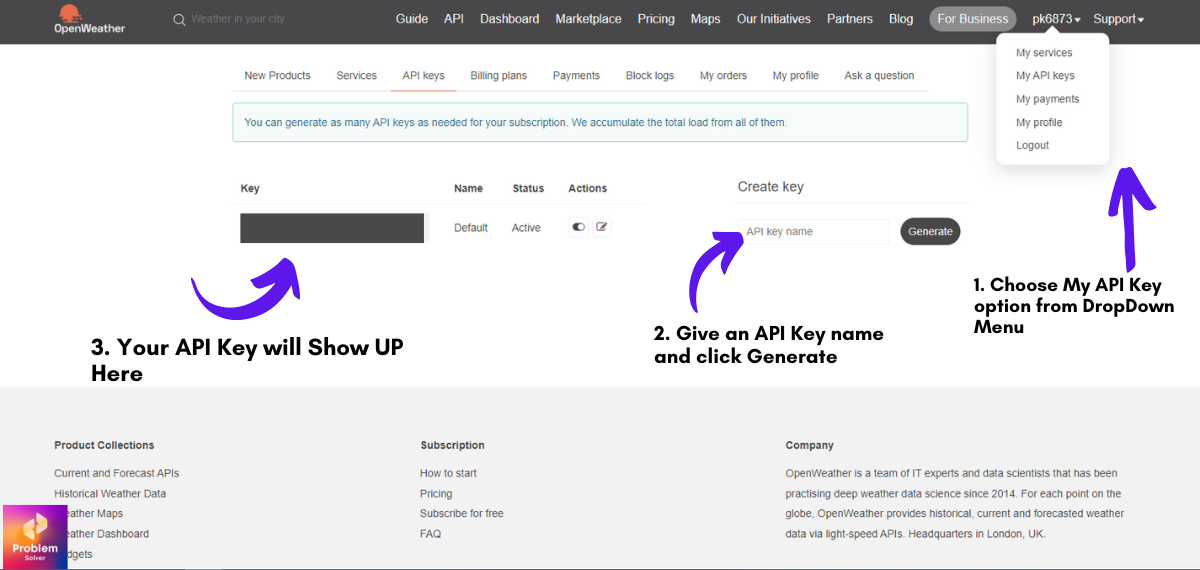
After login into the dashboard of OpenWeatherMap, simply go to your username section and click on the “My API Key” link. You reach the page where we need to generate our API key.
Here we simply go to the portion where it says to name your API key. Give a suitable name. No worries this has no impact on our code. And click generate button.
Feel free to follow my below image as a guide.

And voila! You got your API key. Keep it safe!
Step 3: Coding Battle
Just kidding! The coding part is pretty simple as well. Let me break it down for you:
- We have a clean Bootstrap UI for our card which us the weather report. Use any CSS style framework or your code if need be. Completely your choice!
- We chose to target a specific city in this case. And also decided on data that we will fetch from our OpenWeatherMap API. Again, you can choose a different city or different data set from API. Here is the official documentation link. 🤓
- Now to fetch the API actual data we are using jQuery AJAX in this case. In different cases, you will use different languages for this part. Like in the case of the Android apps you might use Java or Kotlin logic code here. Or in the case of Angular, you will rely on TypeScript.
So let’s get our hand-coded by jumping in our code editors. In my case, it is VS Code.
<!DOCTYPE html>
<html lang="en">

<head>
  <meta charset="UTF-8">
  <meta http-equiv="X-UA-Compatible" content="IE=edge">
  <meta name="viewport" content="width=device-width, initial-scale=1.0">
  <title>Weather API</title>
  <link rel="stylesheet" href="css/bootstrap.min.css">
  <link rel="stylesheet" href="css/style.css">
  <style>
      .card {
        margin: 100px auto 0 auto;
    }
  </style>
</head>

<body>

  <div class="card" style="width: 18rem;">
    <img src="weather.jpg" class="card-img-top">
    <div class="card-body">
      <h5 class="card-title">City: <span class="city"></span></h5>
    </div>
    <ul class="list-group list-group-flush">
      <li class="list-group-item">Temperature: <span class="temp"></span><span class="badge bg-success countrycode"></span></li>
      <li class="list-group-item">Condition: <span class="condition text-capitalize"></span></li>
      <li class="list-group-item">Humidity: <span class="humid text-capitalize"></span></li>
    </ul>
  </div>

  <!-- JS Files Here -->
  <script src="js/jquery.min.js"></script>
  <script src="js/bootstrap.bundle.min.js"></script>
  <script>
    $(document).ready(function () {
      $.ajax({
        url: "https://api.openweathermap.org/data/2.5/weather?q=Delhi&appid=YOURAPIKEYWILLBEHERE&units=metric",
        type: "GET",
        dataType: "JSON",
        success: function (data) {
          // console.log(data);
          $(".city").html(data.name);
          $(".countrycode").html(data.sys.country);
          $(".temp").html(data.main.temp + " Celsius");
          $(".condition").html(data.weather[0].description);
          $(".humid").html(data.main.humidity + " %");
        }
      });
    });
  </script>
</body>

</html>
You can also download the above file code from my GitHub archives here:
Step 4: Your weather app is ready
Truly! you have just implemented your first successful API example. Congrats to you!🥳
With this API example, we have covered how you use third-party API usage cases. Let’s keep the momentum up and proceed to our next part.
Complete CRUD App with rest API example
Now that we have seen how to use API in a simple weather app project. Let us move on to the next API example: That is to perform a CRUD(Create Read Updated Delete) operation.
If you have followed us on building REST API from Scratch with PHP, JSON, and POSTMAN. Then let’s jump to how to use API in an HTML App or any app. And if you are wondering if POSTMAN API is something special then read what and why we use POSTMAN in this article.
Like the previous time, we are going to use jQuery for doing the code-heavy lifting. 👨🏻💻
Why? Because any good coder will tell you:
Writing less code means there will be less bugs in future.
And jQuery is super-succinct to write and easy to implement. You can further compress the files when you deploy them to the working environment by minifying them.
Let’s go to the coding part:
<!doctype html>
<html lang="en">

<head>
  <meta charset="utf-8">
  <meta name="viewport" content="width=device-width, initial-scale=1">
  <link href="css/bootstrap.min.css" rel="stylesheet">
  <link href="css/style.css" rel="stylesheet">
  <title>Rest Api CRUD</title>
</head>

<body>
  <nav class="navbar navbar-expand-lg navbar-dark bg-warning">
    <div class="container-fluid">
      <a class="navbar-brand" href="">Rest Api CRUD</a>
      <button class="navbar-toggler" type="button" data-bs-toggle="collapse" data-bs-target="#navbarColor01"
        aria-controls="navbarColor01" aria-expanded="false" aria-label="Toggle navigation">
        <span class="navbar-toggler-icon"></span>
      </button>

      <div class="collapse navbar-collapse" id="navbarColor01">
        <form class="d-flex">
          <input class="form-control me-sm-2" type="text" id="searchdata" placeholder="Search">
        </form>
      </div>
    </div>
  </nav>

  <div class="alert alert-success location" role="alert" id="success">Success Alert!</div>
  <div class="alert alert-danger location" role="alert" id="error">Error Alert!</div>

  <div class="container">
    <h1 class="text-center mt-3">Rest Api CRUD</h1>

    <div class="add mt-2">
      <form id="addform">
        <div class="row">
          <div class="col-md-3">Name: <input type="text" class="form-control form-control-sm" id="add-name" name="sname"></div>
          <div class="col-md-3">Age: <input type="text" class="form-control form-control-sm" id="add-age" name="sage"></div>
          <div class="col-md-3">City: <input type="text" class="form-control form-control-sm" id="add-city" name="scity"></div>
          <div class="col-md-3"><button class="btn btn-sm btn-success mt-4" type="submit" id="save">Save</button></div>
        </div>
      </form>
    </div>

    <table class="table table-hover table-light text-center mt-3">
      <thead>
        <tr>
          <th scope="col">Id</th>
          <th scope="col">Name</th>
          <th scope="col">Age</th>
          <th scope="col">City</th>
          <th scope="col" colspan="2">Action</th>
        </tr>
      </thead>
      <tbody id="table-content"></tbody>
    </table>

    <!-- Modal -->
    <div id="modal" class="pop-modal">
      <h4 class="text-center">Update</h4>
      <form id="updateForm">
        Name: <input type="text" class="form-control" id="edit-name" name="sname">
        Age: <input type="text" class="form-control mt-2" id="edit-age" name="sage">
        City: <input type="text" class="form-control mt-2" id="edit-city" name="scity">
        <input type="hidden" class="form-control mt-2" id="edit-id" name="sid">
        <br>
        <button class="btn btn-success float-start" type="button" id="update">Update</button>
        <button class="btn btn-sm btn-danger float-end" id="close" type="button">Close</button>
      </form>
    </div>
    <!-- Modal -->

  </div>

  <script src="js/jquery.min.js"></script>
  <script src="js/bootstrap.bundle.min.js"></script>
  <script>
    $(document).ready(function () {

      $("#success").hide();
      $("#error").hide();

      loadData();

      // Fetch All Records
      function loadData() {
        $("#table-content").html("");
        $.ajax({
          url: "localhost/rest_api_example/api_fetch_all.php",
          type: "GET",
          success: function (data) {
            if (data.status == false) {
              $("#table-content").append("<tr><td scope='row' colspan='6'>" + data.msg + "</td></tr>");
            } else {
              $.each(data, function (key, value) {
                $("#table-content").append(
                  '<tr>' +
                  '<th scope="row">' + value.id + '.</th>' +
                  '<td>' + value.name + '</td>' +
                  '<td>' + value.age + '</td>' +
                  '<td>' + value.city + '</td>' +
                  '<td><button class="btn btn-primary edit-btn" data-eid="'+ value.id + '">Edit</button></td>' +
                  '<td><button class="btn btn-danger delete-btn" data-id="'+ value.id + '">Delete</button></td>' +
                  '</tr>');
              });
            }
          }
        });
      }

      // Insert New Data
      $("#save").on("click", function(e){
        e.preventDefault();
        array = $("#addform").serializeArray();

        // To convert our array into JS Object of key:value pair
        var json = giveJson(array);

        if (json == false) {
          message("All Field must not be empty", false);
        } else {
          $.ajax({
            url: "localhost/rest_api_example/api_insert.php",
            type: "POST",
            data: json,
            success: function(data) {
              message(data.msg, data.status);

              // Need to refresh table with inserted record
              if (data.status == true) {
                loadData();
                $("#addform").trigger("reset");
              }
            }
          });
        }
      });

      // Fetch single data for Edit Modal Pop up
      $(document).on("click", ".edit-btn", function () {
        var studentid = $(this).data("eid");
        var obj = {sid: studentid};
        var json = JSON.stringify(obj);

        $.ajax({
          url: "localhost/rest_api_example/api_fetch_single.php",
          type: "POST",
          data: json,
          success: function(data) {
            $("#edit-id").val(data[0].id);
            $("#edit-name").val(data[0].name);
            $("#edit-age").val(data[0].age);
            $("#edit-city").val(data[0].city);
          }
        });

        $("#modal").show();
      });


      // Update Form
      $("#update").on("click", function(e) {
        e.preventDefault();

        array = $("#updateForm").serializeArray();
        var json = giveJson(array);

        console.log(json);

        if(json == false) {
          message("All Field must not be empty", false);
        } else {
          $.ajax({
            url: "localhost/rest_api_example/api_update.php",
            type: "POST",
            data: json,
            success: function(data){
              message(data.msg, data.status);

              if (data.status == true) {
                $("#modal").hide();
                message("Data Updated", true);
                loadData();
              }
            }
          });
        }
      });


      // Delete Data
      $(document).on("click", ".delete-btn", function(){
        if (confirm("Are you sure?")) {
          var delid = $(this).data("id");

          var obj = {"sid": delid };
          var json = JSON.stringify(obj);

          $.ajax({
            url: "localhost/rest_api_example/api_delete.php",
            type: "POST",
            data: json,
            success: function(data) {
              message(data.msg, data.status);

              if (data.status == true) {
                message("Data Delted", true);
                loadData();
              }
            }
          });
        }
      });

      // Search
      $("#searchdata").keyup(function() {
        var searchvalue = $("#searchdata").val();

        var obj = { "search": searchvalue };
        var json = JSON.stringify(obj);

        $.ajax({
          url: "localhost/rest_api_example/api_search.php",
          type: "POST",
          data: json,
          success: function (data) {

            $("#table-content").html("");

            if (data.status == false) {
              $("#table-content").append("<tr><td scope='row' colspan='6'>" + data.msg + "</td></tr>");
            } else {
              $.each(data, function (key, value) {
                $("#table-content").append(
                  '<tr>' +
                  '<th scope="row">' + value.id + '.</th>' +
                  '<td>' + value.name + '</td>' +
                  '<td>' + value.age + '</td>' +
                  '<td>' + value.city + '</td>' +
                  '<td><button class="btn btn-primary edit-btn" data-eid="'+ value.id + '">Edit</button></td>' +
                  '<td><button class="btn btn-danger delete-btn" data-id="'+ value.id + '">Delete</button></td>' +
                  '</tr>');
              });
            }
          }
        })
      });

      // Close Update Modal
      $("#close").on("click", function() {
        $("#modal").hide();
      });

      // Message Logic
      function message(message, status) {
        if (status == false) {
          $("#error").html(message).slideDown();
          setTimeout(function() {
            $("#error").slideUp();
          }, 4000);
        } else {
          $("#success").html(message).slideDown();
          setTimeout(function() {
            $("#success").slideUp();
          }, 4000);
        }
      }

      // Function that converts serialized array into JS objects then into json itself
      function giveJson(array) {
        var obj = {};

        for (var i = 0; i < array.length; i++) {
          if(array[i].value == '') {
            return false;
          }
          obj[array[i].name] = array[i].value;
        }
        var json = JSON.stringify(obj);
        return json;
      }
    });
  </script>
</body>

</html>
After you combine the above file with the previously built Rest API example. You will have a fully functional API crud web app.
Final Words
So by now, you have learned about how to use API with two examples.
First, we built an OpenWeather API-powered Weather Web App. Which is a popular API example where you will need to use third-party services to process data. This is where an API comes in.⚙️
As we know, an API is a software interface that allows you to request a service from a third-party provider.
In the second part, we created our API Crud application with a beautiful interface of Bootstrap 5 UI. In this case, we used our REST API which was connected to our database.
Hope you learned how to use API with these examples. If any doubt feels free to comment and share this with your friend on social media! Ta-da! Keep Coding!😎


Good blog! I truly love how it is simple on my eyes and the data are well written. I am wondering how I could be notified when a new post has been made. I’ve subscribed to your RSS which must do the trick! Have a nice day!