
Introduction
Creating a REST API with Laravel and testing it with Postman is a common task in web development. Laravel is one of the 🔥🔥popular PHP frameworks known for its ease of use and 💪powerful features. For example, for building APIs. As for Postman is a tool that allows you to test API endpoints quickly🤯.
But before we go code away into our restful apis tutorial. Check how to develop apis with only core PHP, JSON, and Postman in 9 steps. And, we also offer a detailed guide 🤩 to creating a PHP contact form in a previous post.
Here’s our step-by-step guide on creating a REST API with Laravel and testing it using Postman.
Step 1: Install Laravel
If you haven’t already, you need to install Laravel on your development environment 👩💻. You can do this using Composer, a PHP package manager. To install composer, follow the instructions on the official website 🤩🤩: https://getcomposer.org/download/.
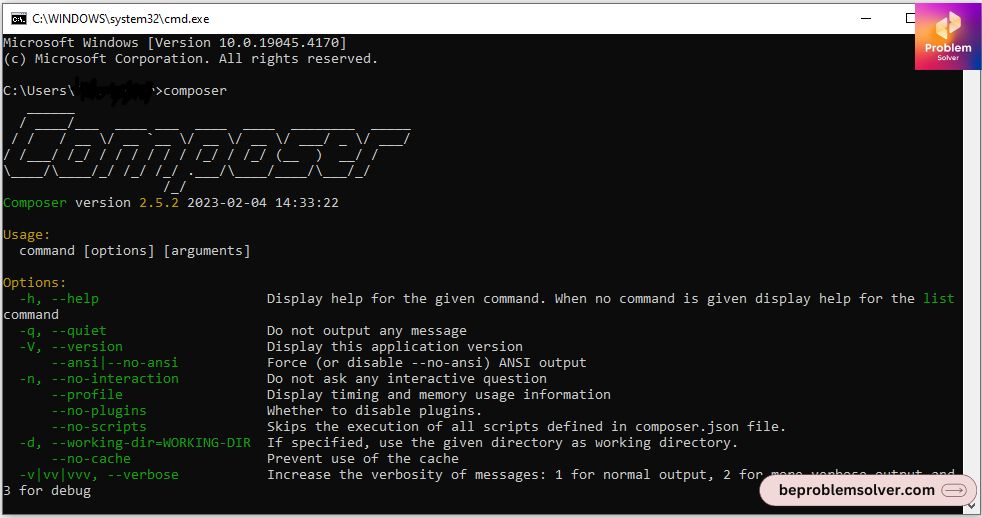
Next, do a confirmation of whether Composer is installed. See the below screenshot.
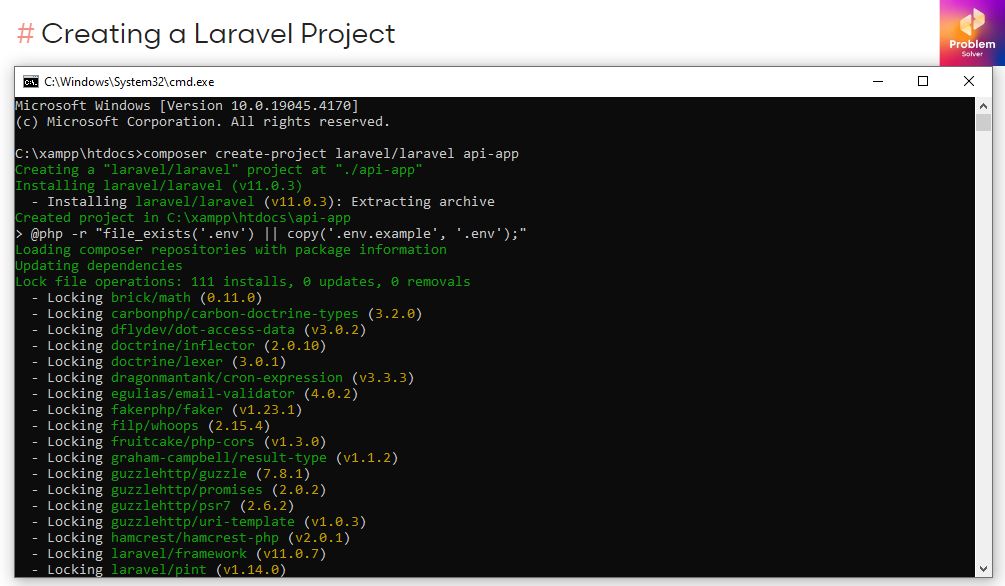
After confirming, let’s do our standard Laravel installation 👌 with this artisan command.
composer create-project laravel/laravel apiapp
Your command prompt✍🏻 will look like the below screenshot:
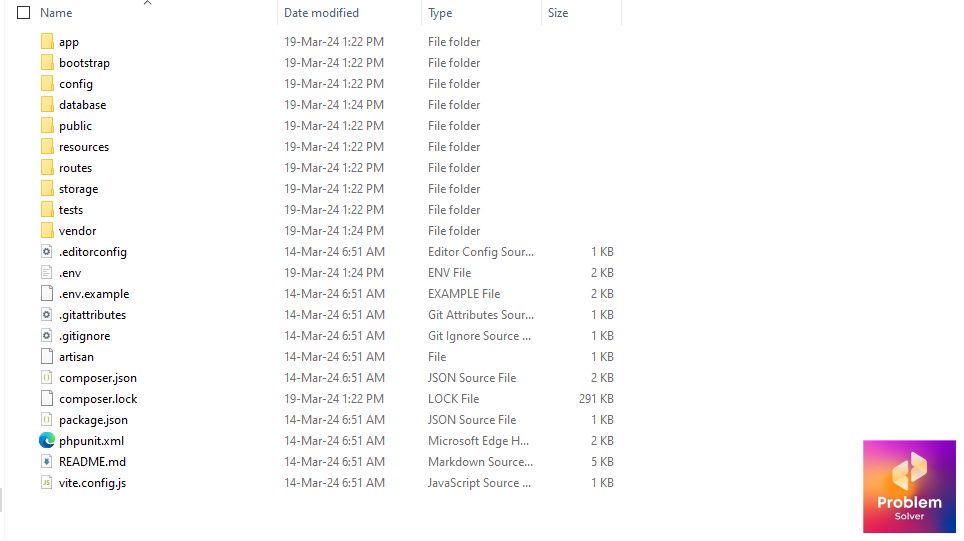
Finally, if your installation is successful 😇. You get a folder structure similar to the below screenshot. Don’t worry about minor changes. As they will occur in different Laravel versions.
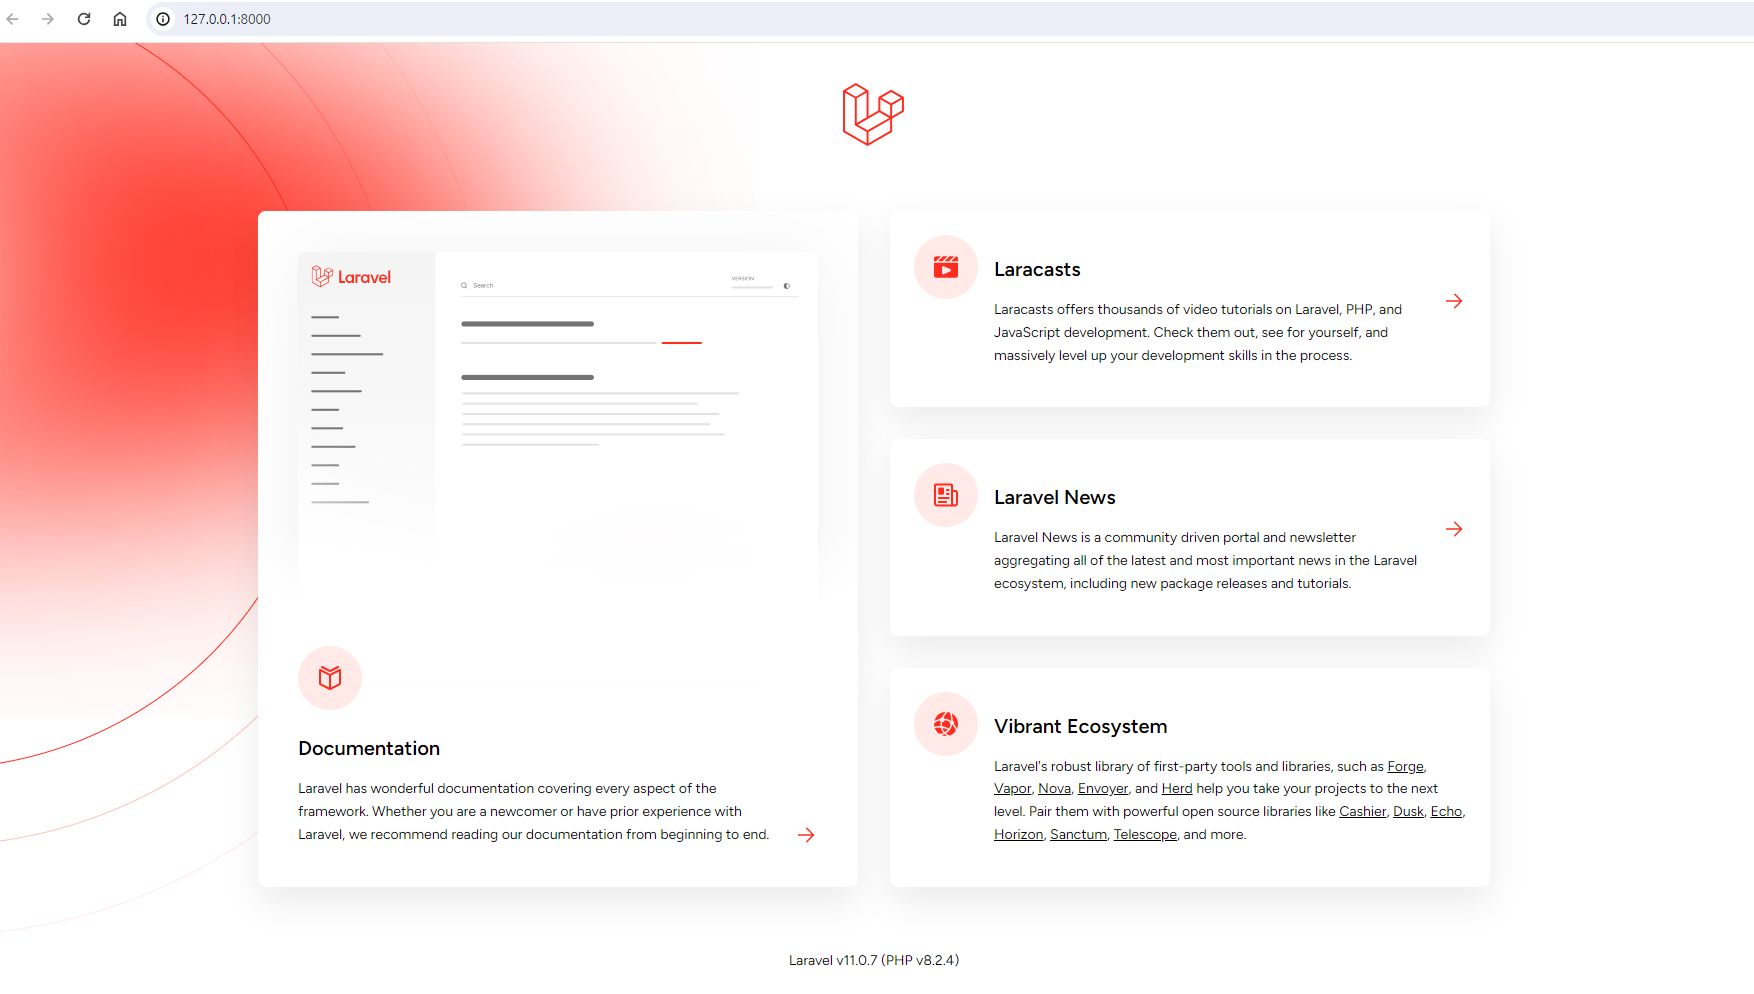
Now, we run our project☄️☄️ using the following Laravel artisan command:
php artisan serve
And finally, we can see that we have successfully installed our Laravel project 🏆. Now we are ready to learn how to build an API!
Yup!!!🥁🥁 We are ready to continue our restful apis tutorials. But first, we must build a demo API to check whether our Laravel app is ready or not 🕵🏼♂️!
Step 2: Api how to create: Dummy API Test
Before building an API that can be deployed in a professional project 🎯🎯. We must test our Laravel setup. And using our Postman program we test our Dummy API.
In the first step, we create a controller to handle the API logic. Run the below PHP artisan command to create a controller.
php artisan make:controller DummyApi
Once the controller file is created. Let’s populate our code.
DummyApi.php (Controller file)
<?php
namespace App\Http\Controllers;

use Illuminate\Http\Request;

class DummyApi extends Controller
{
    //Dummy Api purely for testing
    public function index()
    {
        return ["hello" => "Testing API"];
    }
}
Next, we must link this controller with a route so that we can access it 👏🏻👏🏻. But remember when we are working APIs, we use api.php not the default route file 💻.
If you don’t have any api.php files. Then run the below command in a terminal.
php artisan install:api
Let’s define a dummy route for our dummy API ✏️.
api.php (Route file)
<?php

use Illuminate\Http\Request;
use Illuminate\Support\Facades\Route;
use App\Http\Controllers\DummyApi;

Route::get('/dummyapi', [DummyApi::class, 'index']);
Lastly, we test our dummy API in Postman like this.
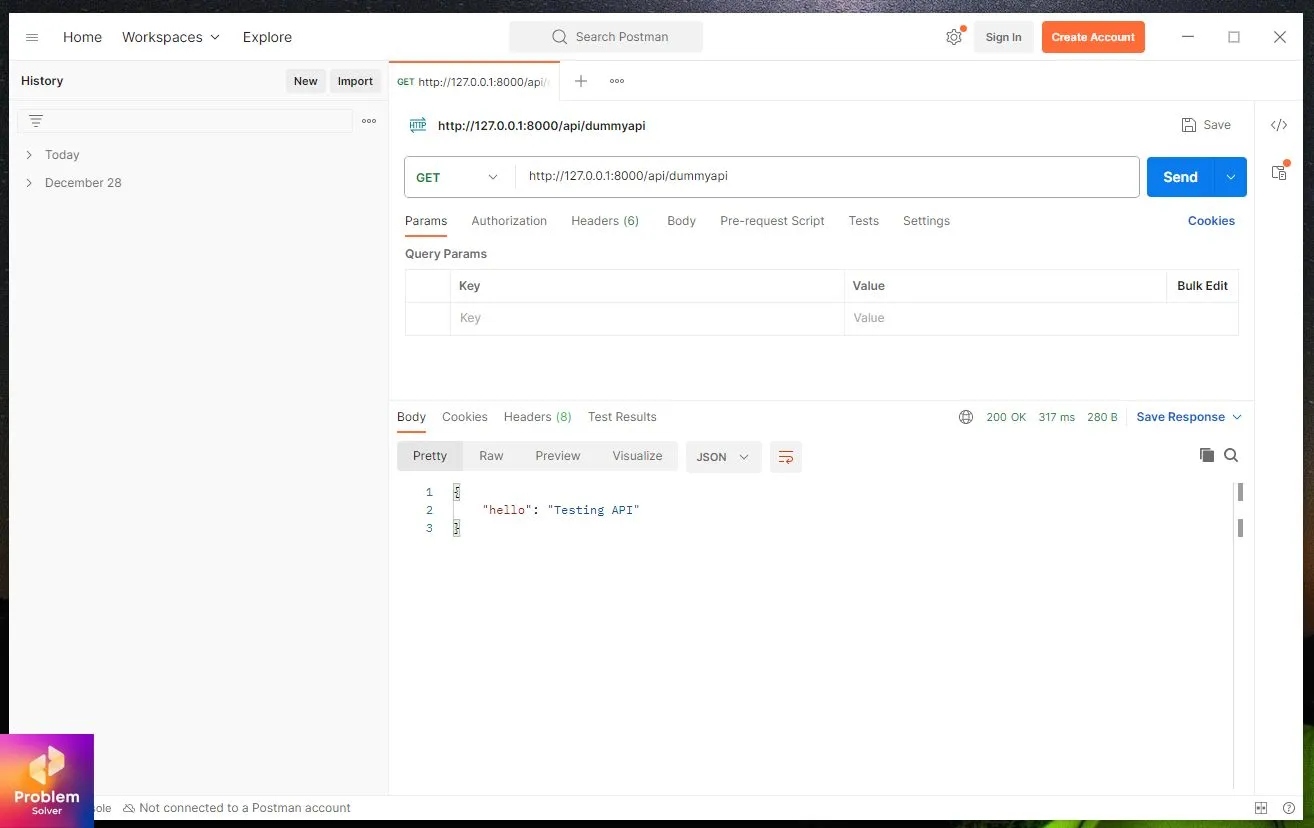
As you can see, in Postman we set our request protocol to “GET”. And then hit the below URL and get our answer.
http://127.0.0.1:8000/api/dummyapi
Great work till now. We have successfully tested our dummy API. Now let’s move on to how to build an API for actual usage.
Step 3: Rest API with Laravel
First, create a database so that we can store data. Unlike the dummy where we store data in the controller itself. We now store data in our database:
To activate and link our database we go to our .env file. Make sure your db connection is MySQL since we are using MySQL.
DB_CONNECTION=mysql
DB_HOST=127.0.0.1
DB_PORT=3306
DB_DATABASE=laravel_api
DB_USERNAME=root
DB_PASSWORD=
Since we are using Xammp as our local server, we are going with username: root and password: (blank).
Now we can create our model file with the PHP artisan command:-
php artisan make:model Apimodel
We pass our database table name into $table variable. Use $timestamps = false to disable updated_on and created_on in the Laravel table.
<?php

namespace App\Models;

use Illuminate\Database\Eloquent\Factories\HasFactory;
use Illuminate\Database\Eloquent\Model;

class Apimodel extends Model
{
    use HasFactory;
    public $table = "studentdata";
    public $timestamps = false;
}
Moving on, we must insert dummy data in our table – “studentdata“.
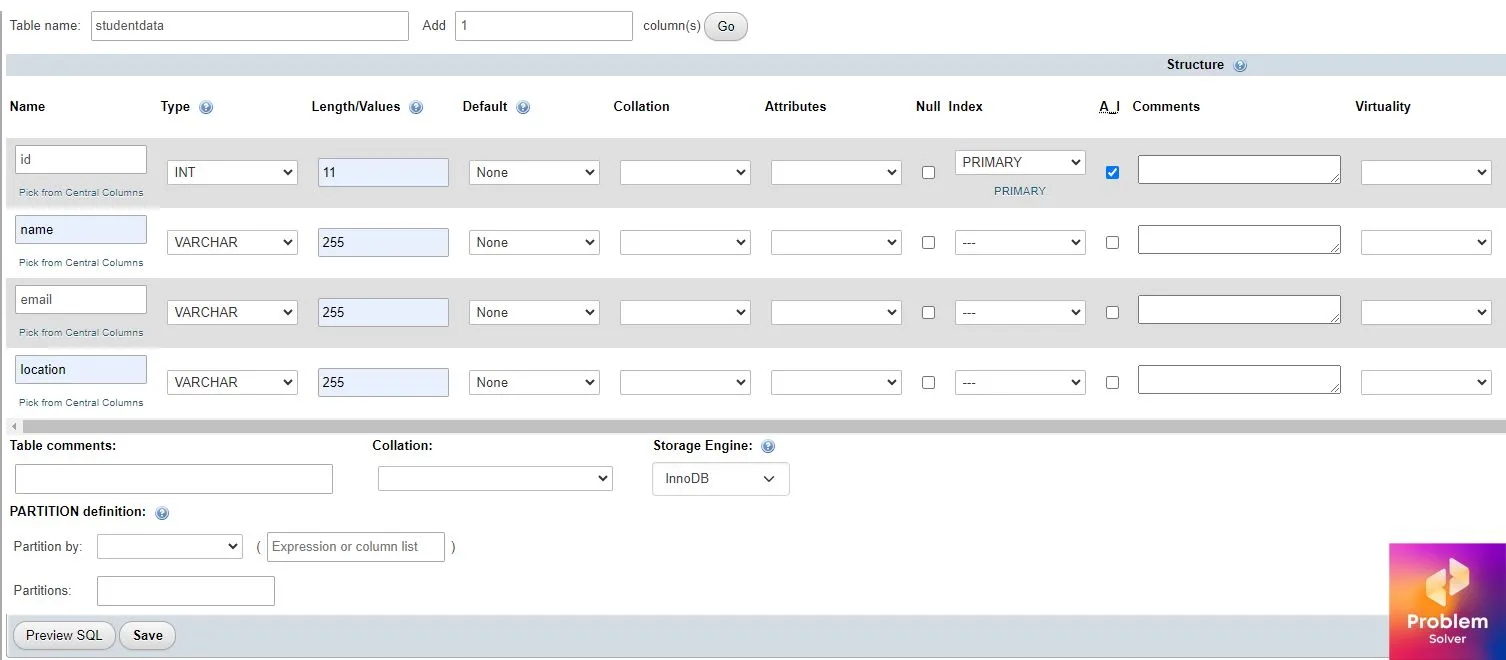
INSERT INTO `studentdata` (`id`, `name`, `email`, `location`) VALUES (NULL, 'Beck', '[email protected]', 'United States'), (NULL, 'John', '[email protected]', 'Canada');
After running the above SQL command we get our data inserted and it will look like this:

Now let’s build a controller for our student API.
php artisan make:controller StudentApiController
Let’s code our controller next.
StudentApiController.php
<?php

namespace App\Http\Controllers;

use Illuminate\Http\Request;
use App\Models\Apimodel;

class StudentApiController extends Controller
{
    //Get all data from student data
    public function index()
    {
        return Apimodel::all();
    }
}
Remember to migrate our new table data otherwise, Laravel throws us errors. Just run below artisan command :
php artisan migrate
Now let’s move on.
Step 4: GET data API(by providing some id-compulsory)
Set controller StudentApiController.php
<?php

namespace App\Http\Controllers;

use Illuminate\Http\Request;
use App\Models\Apimodel;

class StudentApiController extends Controller
{
    //Get data from student data by id
    public function index($id)
    {
        return Apimodel::find($id);
    }
}
Now onto our api.php
<?php
use Illuminate\Http\Request;
use Illuminate\Support\Facades\Route;
use App\Http\Controllers\StudentApiController;
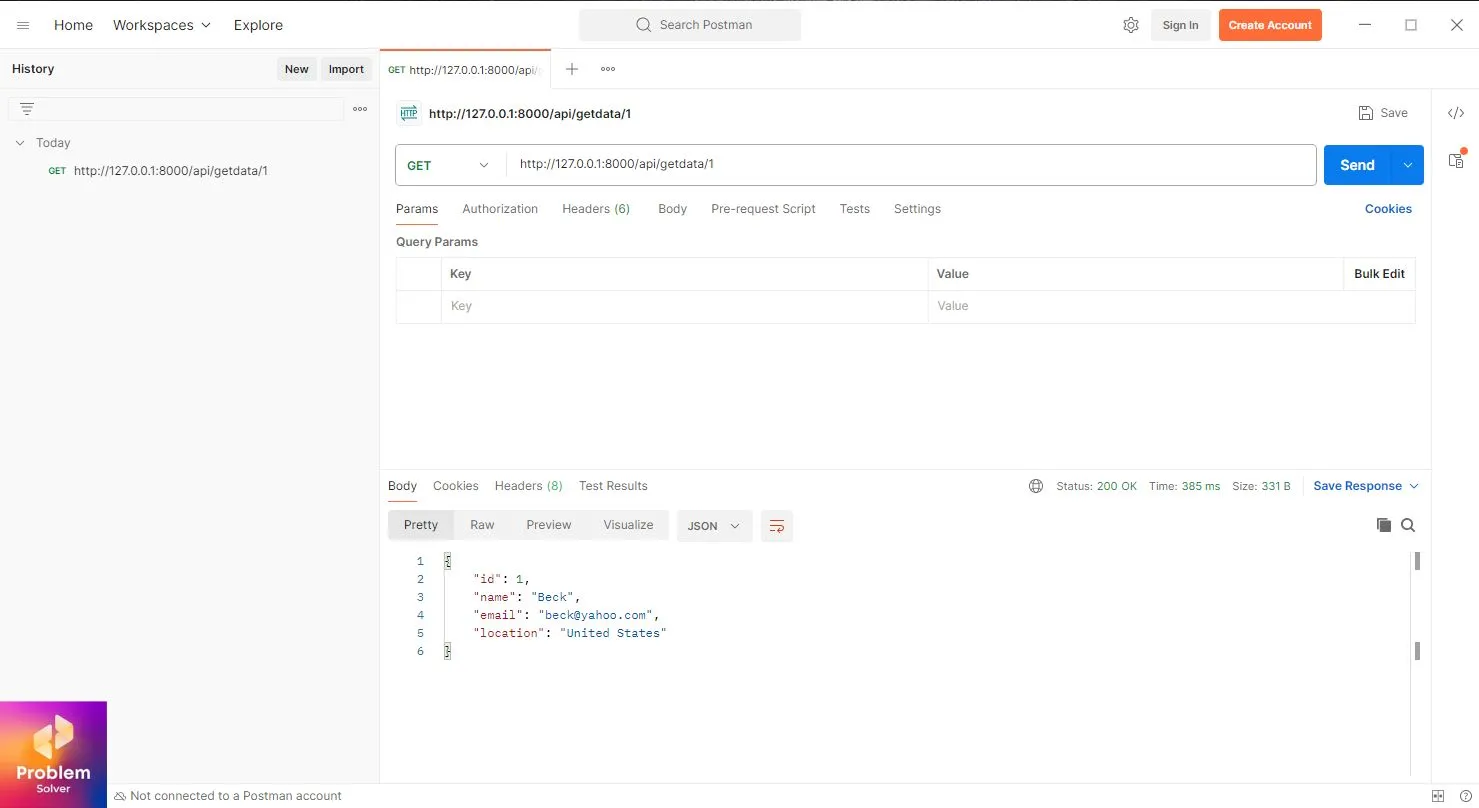
Route::get('getdata/{id}', [StudentApiController::class, 'index']);Set URL in Postman as:
http://127.0.0.1:8000/api/getdata/1
If you feel tired from all this coding, take a break by watching 25 must-watch isekai anime in 2024. Now moving to the next section of our tutorial.
Step 5: GET data API (optional ID)
In the controller file add this method:
//Get data from studentdata by id(optional)
    public function getdata($id = null)
    {
        return ($id) ? Apimodel::find($id) : Apimodel::all();
    }
In route file:
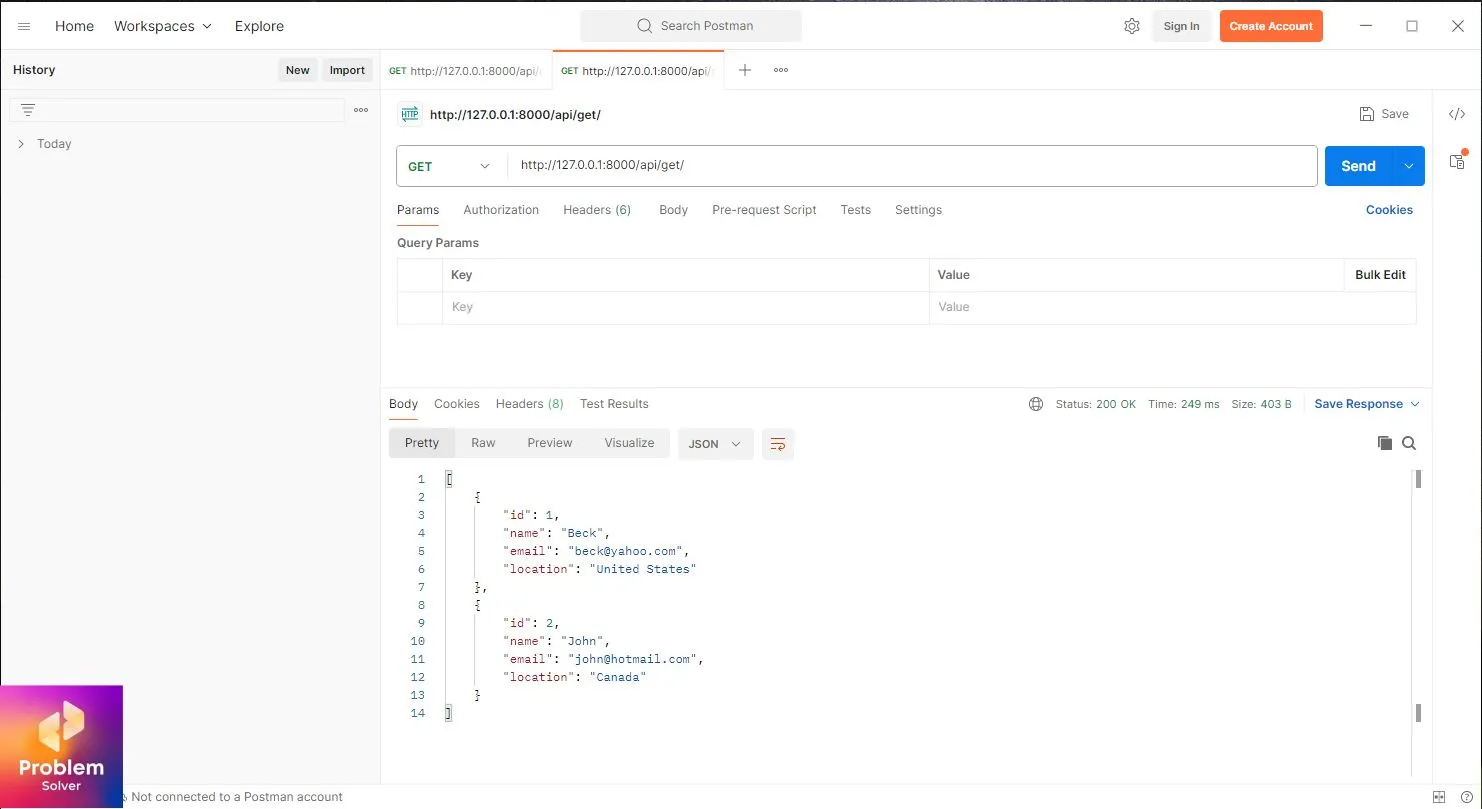
Route::get('get/{id?}', [StudentApiController::class, 'getdata']);Set URL in Postman as:
http://127.0.0.1:8000/api/get/
Step 6: POST data API
Update the adddata() method in our controller.
// Add data into studentdata by JSON format
    public function adddata(Request $request)
    {
        $apidata = new Apimodel;
        $apidata->name = $request->name;
        $apidata->email = $request->email;
        $apidata->location = $request->location;

        if ($apidata->save()) {
            return ["Result" => "Done"];
        } else {
            return ["Result" => "Failed"];
        }
    }
Add this code to the route file:
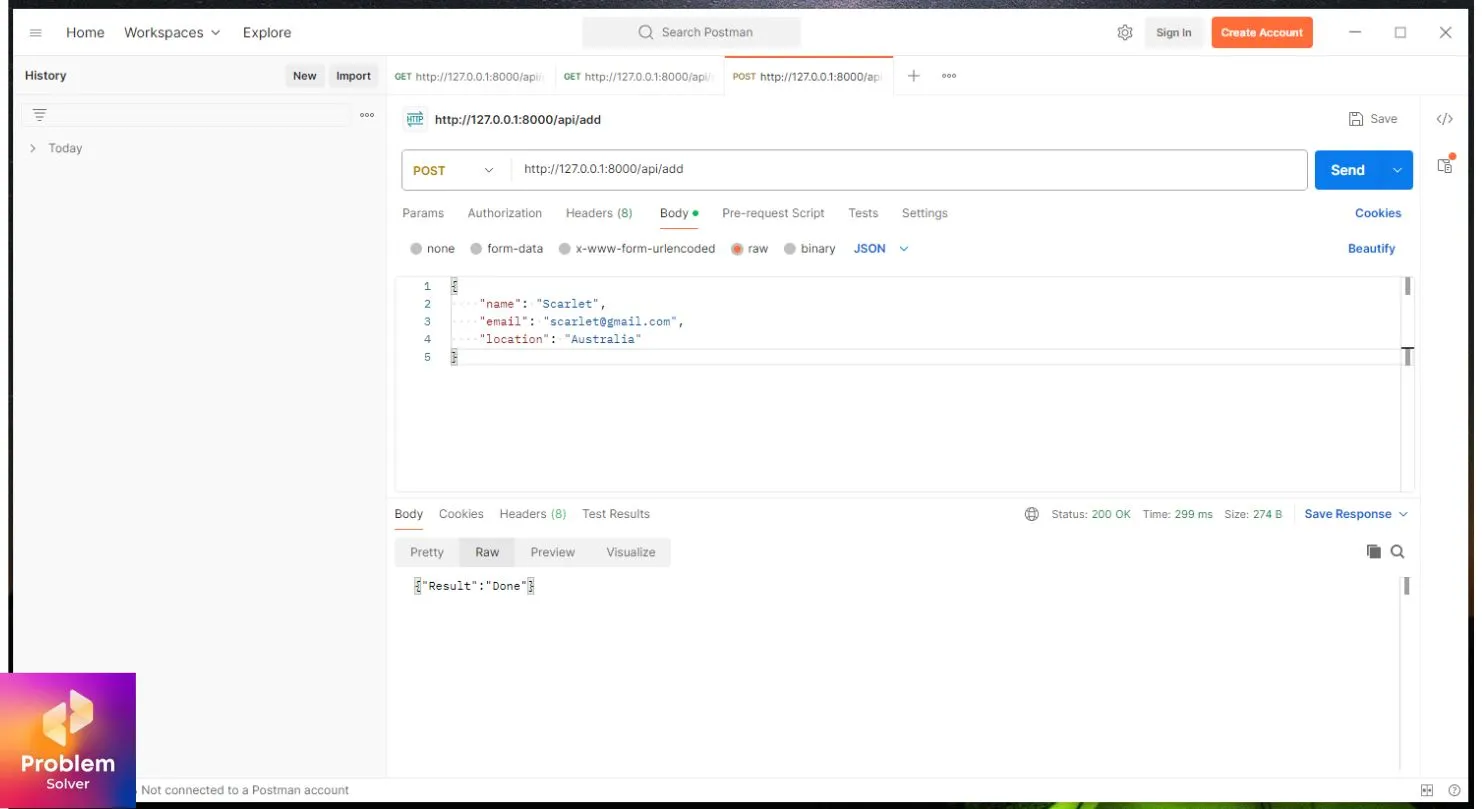
Route::post('add', [StudentApiController::class, 'adddata']);Set URL in Postman as:
http://127.0.0.1:8000/api/add/
And pass raw data in JSON format as:
{
    "name": "Scarlet",
    "email": "[email protected]",
    "location": "Australia"
}
The result will be like this and new data will be updated.
Step 7: Update data API
Code in the controller:
// Update data into studentdata by data in JSON format
    public function updatedata(Request $request)
    {
        $apidata = Apimodel::find($request->id);

        $apidata->name = $request->name;
        $apidata->email = $request->email;
        $apidata->location = $request->location;

        if ($apidata->save()) {
            return ["Result" => "Updated"];
        } else {
            return ["Result" => "Failed"];
        }
    }
In the routing file api.php
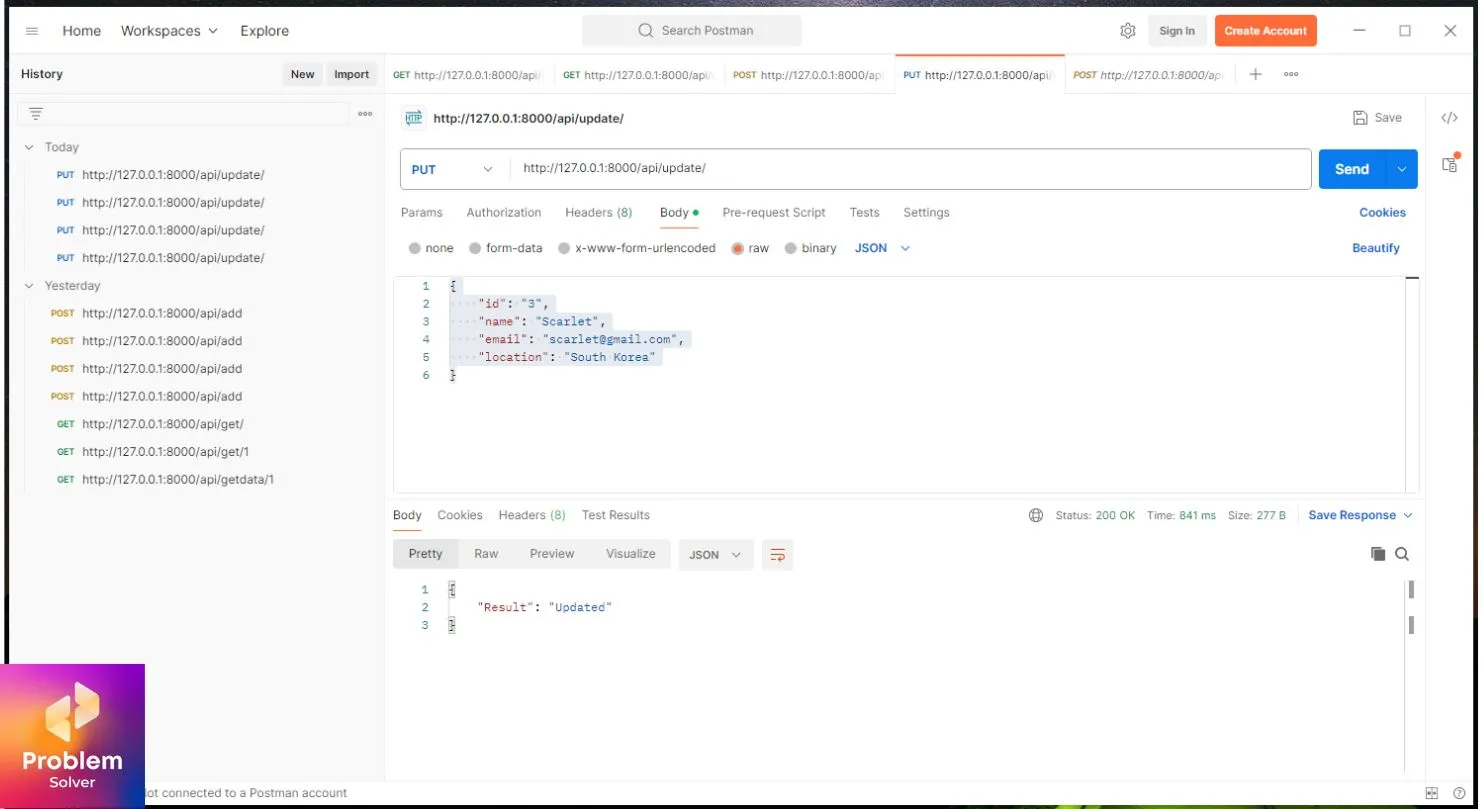
Route::put('update', [StudentApiController::class, 'updatedata']);Enter the below data which looks like this:
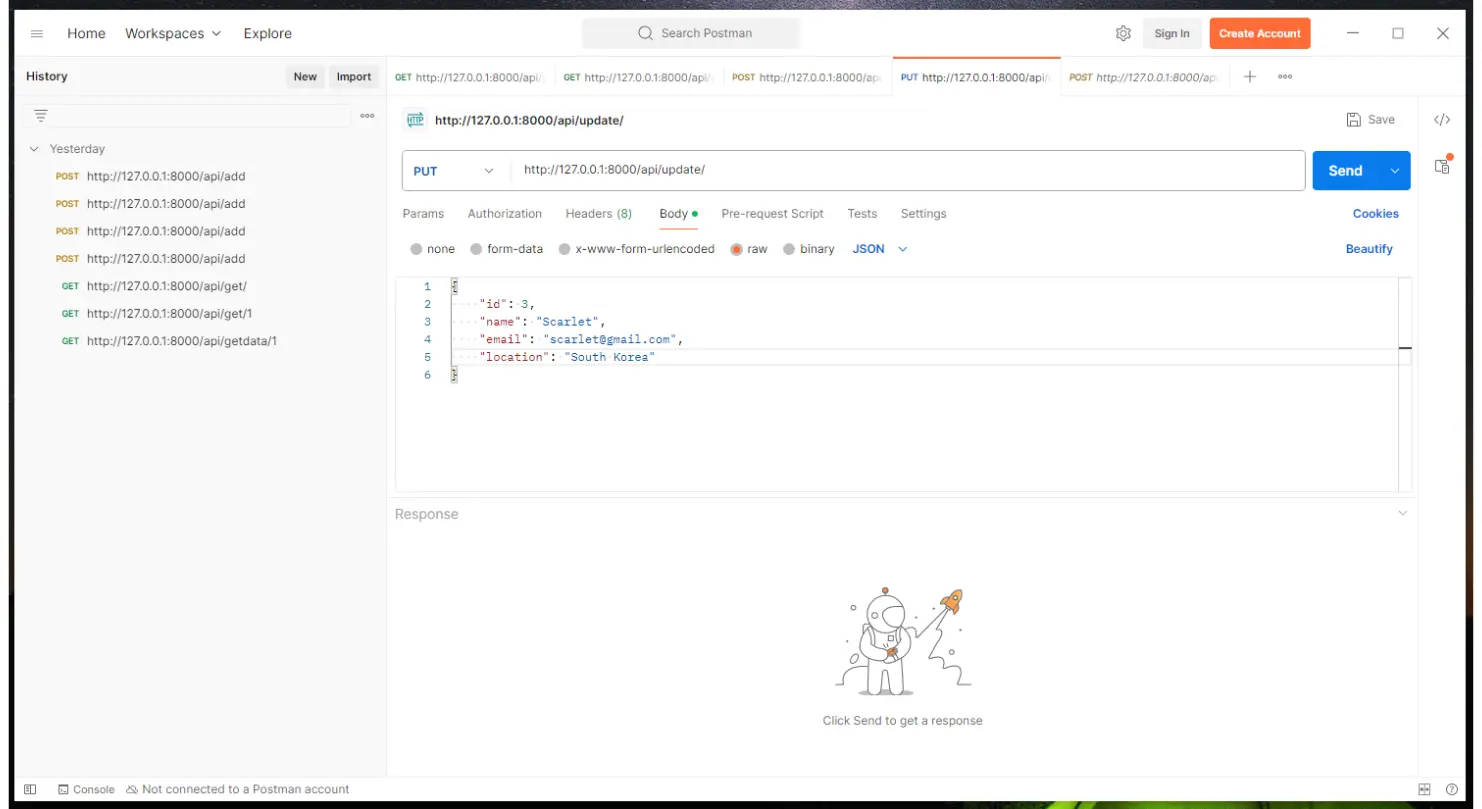
{
    "id": "3",
    "name": "Scarlet",
    "email": "[email protected]",
    "location": "South Korea"
}
Run the below link on our POSTMAN app. And choose the PUT option.
http://127.0.0.1:8000/api/update/
The final result is when updating data via update API.
Step 8: Delete data API
The method in our controller:
// Delete data into studentdata by data in JSON format
    public function deletedata(Request $request)
    {
        $apidata = Apimodel::find($request->id);

        if ($apidata->delete()) {
            return ["Result" => "Deleted"];
        } else {
            return ["Result" => "Failed"];
        }
    }
Next up is our route file: api.php
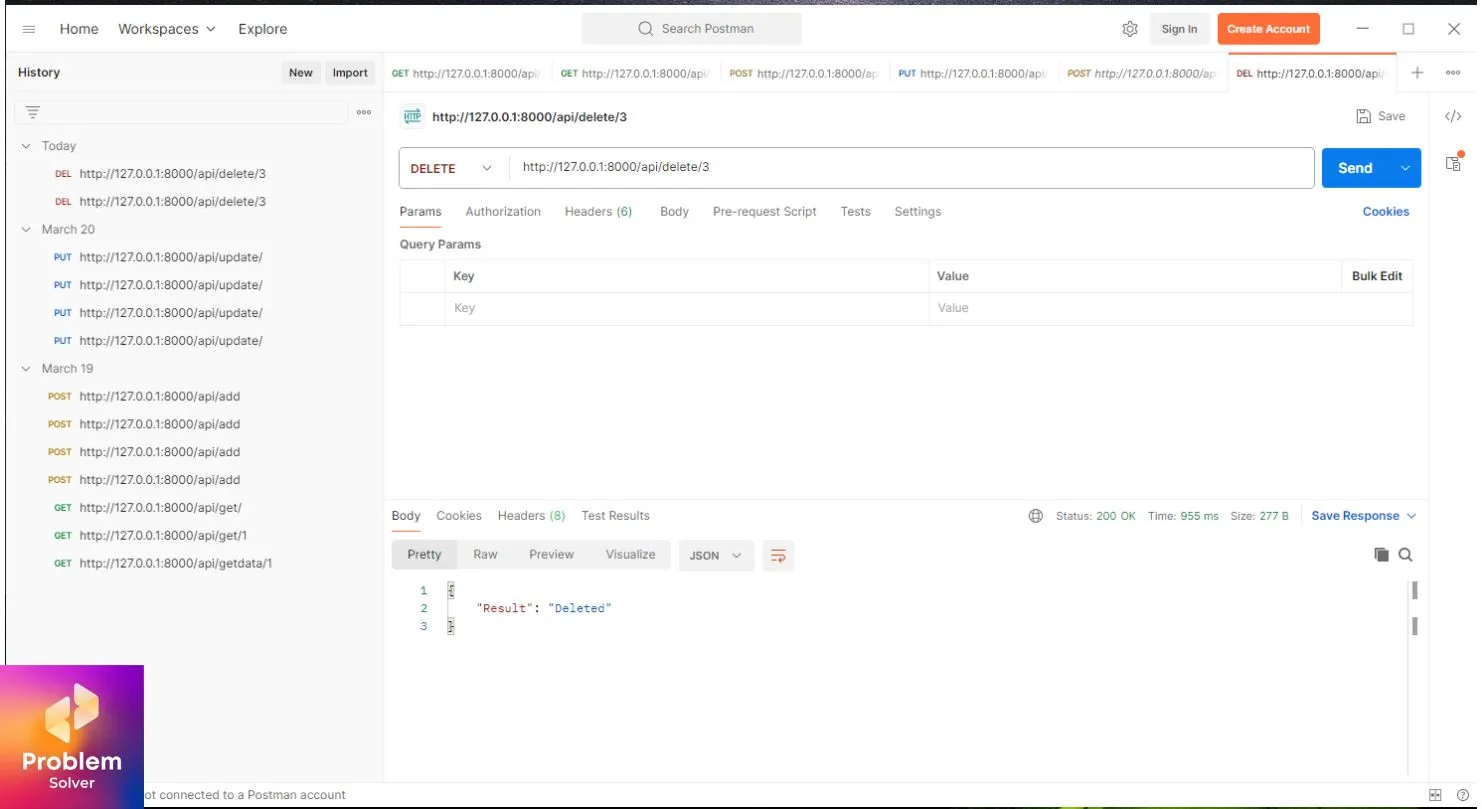
Route::delete('delete/{id}', [StudentApiController::class, 'deletedata']);The final result in the Postman App.
Step 9: Search Data API
First, we build a method in our controller file.
// Search data in studentdata
    public function searchdata($search)
    {
        return Apimodel::where("name", "like", "%$search%")->get();
    }
Route file details:
Route::get('search/{search}', [StudentApiController::class, 'searchdata']);Lastly, you can test this search data API using Postman in the below API:
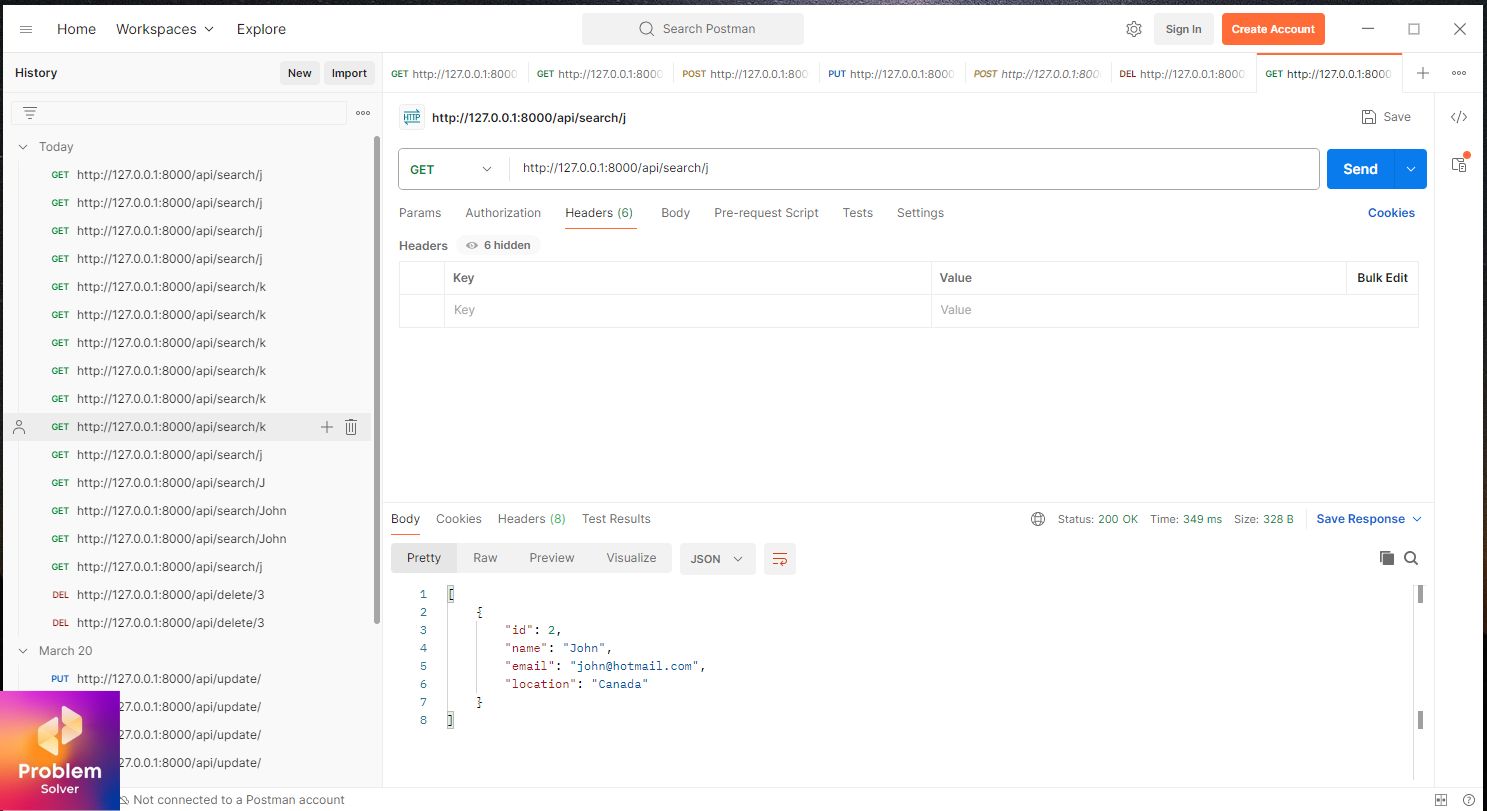
http://127.0.0.1:8000/api/search/j
Result in Postman App:
Restful Apis Tutorial: Conclusion
In this tutorial, we have successfully created 🤗 a basic REST API with Laravel and tested it using Postman. The API we have built is a starting point, and you can further develop apis. Feel free to add features such as authentication, validation, and more 🤯.
We recommend downloading the complete project from our GitHub repos 🔍🔍. This gives you access to the codebase and allows you to customize it to meet your needs.
Feel free to check our previous post about how to Craft a custom cursor using 3-steps in CSS & Javascript.
Thank you for following along with this tutorial. We hope it has been helpful in your journey to becoming a proficient Laravel developer. Ta-da! Keep Coding 😎!