Introduction
User login functionality in a website is a pretty simple but compulsory component. In all modern dynamic websites, the client asks for a login and admin panel so that they can do basic tasks.
You can also see the second part of this post in: The registration Form in the HTML post.
Today I will give you a simple and clean-looking login system with PHP and MySQL. We will maintain the login tracking with PHP Sessions and let Bootstrap make us a clean UI Design.
Why PHP? Because despite being ancient. As some developers believe. PHP is fundamental to our web.
Around 81.7% of the websites on the web use PHP as their server-side language.
And why not PHP?
PHP powers famous CMS(Content Management System) like WordPress and Joomla. Open Source OOPs frameworks like Laravel and CodeIgniter. And numerous others.
Reason: PHP is simple and clean to write. Easy-to-understand and beginner-friendly. Vast community support and adaptability toward developer needs.
Let’s what will do in this simple project:
- User Login Design with Bootstrap 5
- PHP code for MySQL Database
- Logic to process the login request
- Throw errors if the wrong entry of login credentials
- Redirect to Admin if successful request
- Conclusion
Forging a clean UI with Bootstrap for User Login
First, we create index.php and write our UI design with the latest Bootstrap 5. We added Google Fonts Poppins for making our UI look eye-catching. Whenever possible, we relied on CDN links because it keeps our code lightweight and less resource intensive.
index.php file
<!doctype html>
<html lang="en">

<head>
  <!-- Required meta tags -->
  <meta charset="utf-8">
  <meta name="viewport" content="width=device-width, initial-scale=1">

  <!-- CSS -->
  <link href="https://fonts.googleapis.com/css2?family=Poppins&display=swap" rel="stylesheet">
  <link href="https://cdn.jsdelivr.net/npm/[email protected]/dist/css/bootstrap.min.css" rel="stylesheet">
  <link rel="stylesheet" href="assets/css/style.css">

  <title>Login</title>
</head>

<body>
  <div class="container text-center d-flex align-items-center min-vh-100">

    <div class="card mx-auto bg-info py-5" style="width: 25rem;">
      <h1>Login</h1>

      <div class="card-body">
        <form action="" method="post">
          <div class="mb-3">
            <label for="email" class="form-label">Email address</label>
            <input type="email" class="form-control" id="email" name="email" required>
          </div>
          <div class="mb-3">
            <label for="password" class="form-label">Password</label>
            <input type="password" class="form-control" id="password" name="password" required>
          </div>

          <button type="submit" class="btn btn-primary" name="login">Login</button>
        </form>
      </div>
    </div>

  </div>

  <!-- JS -->
  <script src="https://cdn.jsdelivr.net/npm/[email protected]/dist/js/bootstrap.bundle.min.js"></script>
</body>

</html>
Next, we do simple CSS styling in our style.css file. To make our plain background something fun to look at, I have added a small background image in webp format. Also, coded in background color as a backup in the case of legacy browsers that do not support webp format yet.
* {
  margin: 0;
  padding: 0;
  box-sizing: border-box;
}

body {
  font-family: 'Poppins', sans-serif;
  background: #f1f1f1;
  background: url("../img/email-pattern.webp");
}
Build and Hook up your MySQL database
Before we start preceding the actual PHP logic part. We need a database for keeping a record of our login users. And the best choice of course is MySQL–why because it’s free and open source like PHP. Not to mention very beginner-friendly.
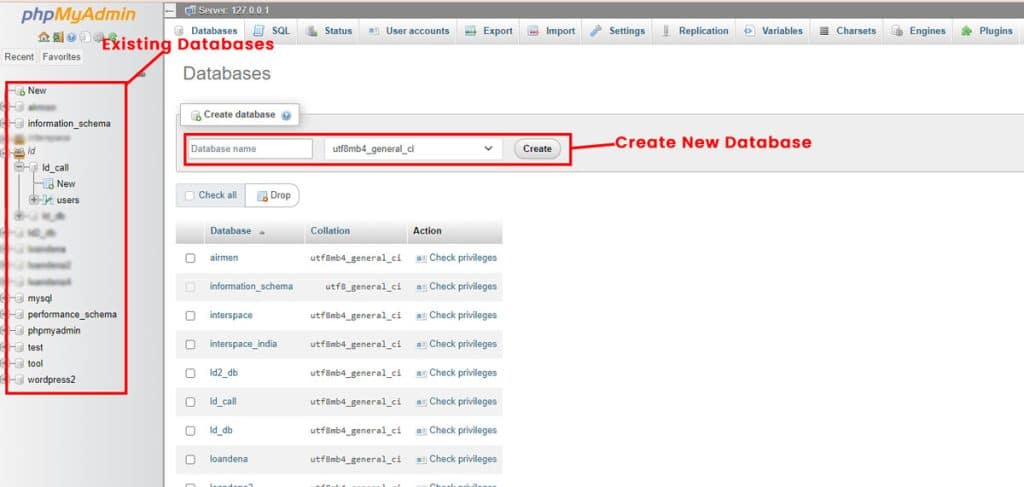
First, go to your PHPMyAdmin whether you’re working online or in the local environment. And set up your database with a relevant name to your project.

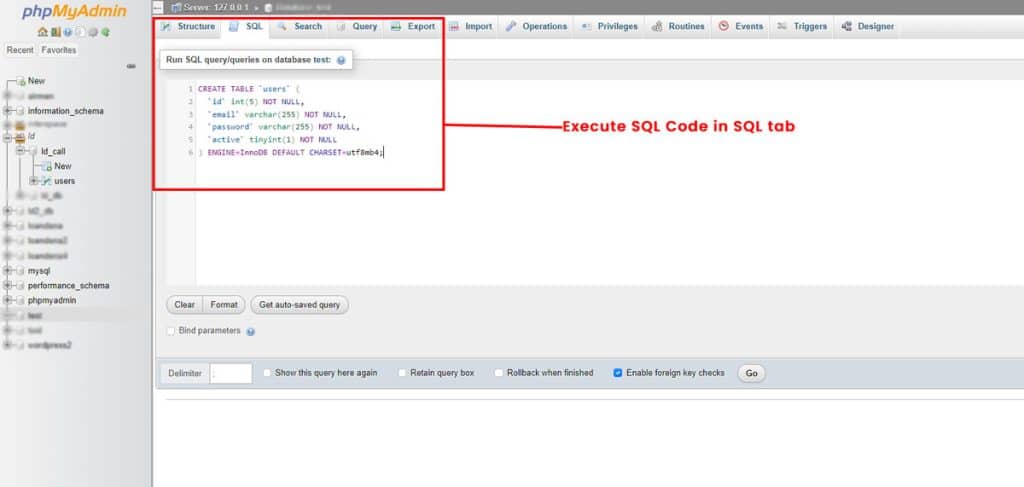
After the Database is created. Set up a table named users which has mainly four columns we need: id, email, password, and active. We can also execute the below SQL code in the PHPMyAdmin SQL tab and this will generate our table “users”.
CREATE TABLE `users` (
  `id` int(5) NOT NULL,
  `email` varchar(255) NOT NULL,
  `password` varchar(255) NOT NULL,
  `active` tinyint(1) NOT NULL
) ENGINE=InnoDB DEFAULT CHARSET=utf8mb4;

We can insert user login details by running the following SQL code. We are hard-coding this now. But we can create a PHP code for the signup process later. First, we must deploy our user login system.
INSERT INTO `users` (`id`, `email`, `password`, `active`) VALUES
(1, '[email protected]', '1234', 1);
Next in line, we hook up a connection between MySQL and PHP:
connection.php
<?php
$servername = "localhost"; // Enter Your severname here
$username = "root"; // Enter your MySQL database username here
$password = ""; // // Enter your MySQL database password here
$dbname = "ld_call"; // Enter your Database Name here

$conn = new mysqli($servername, $username, $password, $dbname);

if ($conn->connect_error) {
  die("Connection failed: " . $conn->connect_error);
}
Now our UI and database are set. Next, we tackle our User Login process head-on! Yay! I am excited!
Also, check our latest post on how to Create Rest API with Laravel and Postman in 9 steps.
Fun Logic of PHP User Login System
We can all be intimated by logic in programming languages. I remember dreading the C++ practical exams in school. It was so pain-wracking process to write the simplest logic. But it is mostly because– we don’t try to understand why we are writing the code.
Of course, you say to run our program and accomplish something.
But breaking it down into small chunks and bits of pieces is more useful. Let’s understand with current logic.
We need to determine the login process. But before you write any code. Let’s write pseudo-code.
What the heck is pseudo-code?
Good question! It’s not actual code. When we write small pieces of notes we as coders for simplifying the complex logic processes — we call them pseudo-code.
Sure, our login process is pretty straightforward. And we could code it without effort.
But if you get in habit of writing pseudo-code before writing a single line of actual code. You will fall in love with coding. And even page-long logic will seem like child play for you.
Pseudo Code for User Login Process:
- The login form is filed by the user and submit is clicked.
- Details arrive at the logic part. Where first we clean them for any unintentional garbage like backslashes, whitespace, etc.
- Sanitized login details are stored and then compared with values inside our database for verification.
- If no match then we pop up an error message for the user.
- If the details match up, we redirect the user to the admin page.
- Also, code a session that tracks our logged-in user.
- Set up a logout process that removes our session.
Avoid creating too many pieces when writing pseudo code and vice versa don’t make too few of them.
Now, let us jump to the actual code:
<?php
require_once("connection.php");
session_start();

function santize($data)
{
  $data = trim($data);
  $data = stripslashes($data);
  $data = htmlspecialchars($data);
  return $data;
}

if (isset($_POST['login'])) {
  $email = santize($_POST['email']);
  $password = santize($_POST['password']);

  $sql = "SELECT id FROM users WHERE email = '$email' AND password = '$password' AND active = 1";
  $result = mysqli_query($conn, $sql);

  if (mysqli_num_rows($result) > 0) {
    $_SESSION['login_active'] = [$email, $password];
    header("Location: admin.php");
    exit();
  } else {
    $_SESSION['errors'] = "Login Error! Check Email & Password";
    header("Location: index.php");
    exit();
  }
}
?>
Before we go to the admin part. Add this snippet block for showing user login errors. This is to implement a temporary PHP session. Paste this code in a place where you want to show errors. Mind UI though.
<?php if (isset($_SESSION['errors'])) : ?>
        <div class="alert alert-warning alert-dismissible fade show" role="alert">
          <?php
          $message = $_SESSION['errors'];
          unset($_SESSION['errors']);
          echo $message;
          ?>
          <button type="button" class="btn-close" data-bs-dismiss="alert" aria-label="Close"></button>
        </div>
      <?php endif; ?>
Insert this snippet code of PHP at the top of our index.php and create admin.php which will be displayed in case of a successful login attempt.
admin.php
<!doctype html>
<html lang="en">
<head>
  <!-- Required meta tags -->
  <meta charset="utf-8">
  <meta name="viewport" content="width=device-width, initial-scale=1">
  <!-- Bootstrap CSS -->
  <link href="https://cdn.jsdelivr.net/npm/[email protected]/dist/css/bootstrap.min.css" rel="stylesheet">
  <link rel="stylesheet" href="assets/css/style.css">
  <title>Admin</title>
</head>
<body>
  <nav class="navbar navbar-expand-lg navbar-dark bg-dark">
    <div class="container-fluid">
      <a class="navbar-brand" href="">Admin</a>
      <button class="navbar-toggler" type="button" data-bs-toggle="collapse" data-bs-target="#navbarSupportedContent" aria-controls="navbarSupportedContent" aria-expanded="false" aria-label="Toggle navigation">
        <span class="navbar-toggler-icon"></span>
      </button>
      <div class="collapse navbar-collapse" id="navbarSupportedContent">
        <ul class="navbar-nav me-auto mb-2 mb-lg-0"></ul>

        <div class="d-flex">
          <a class="btn btn-outline-danger" href="logout.php">Logout</a>
        </div>
      </div>
    </div>
  </nav>

  <div class="container">
    <h1>Welcome to Admin</h1>
  </div>

  <!-- Option 1: Bootstrap Bundle with Popper -->
  <script src="https://cdn.jsdelivr.net/npm/[email protected]/dist/js/bootstrap.bundle.min.js"></script>
</body>
</html>
Now we can insert PHP code at the top of admin.php which checks whether you are login session is active. Without this, everyone will be able to access your admin file. So do put this code above your admin.php Html code.
Note: You can use this code on other pages that need to be secured by the login process.
<?php
require_once("connection.php");
session_start();

if (!isset($_SESSION['login_active'])) {
  header("Location: index.php");
  exit();
}
?>
Now we are pretty much ready to deploy our user login functionality at any server or local host. You can combine this PHP user login with the PHP Shopping cart as well.
Conclusion
Now that we have the seen whole process of building a user login system with PHP, MySQL, and Bootstrap 5. You can just copy the code and deploy it as needed. Below you download the whole code from my GitHub repository. It also includes the database file of SQL– so don’t forget to import it if using that code.
And if you are looking for an amazing free code editor. Check out our Why VS code in the 2022 post.
Lastly if, you think our code helped you solve a need or problem then do comment and follow us on GitHub and social media. Have fun guys!😊 Problem Solver is signing off! Ta-da. 👋


I was pretty pleased to find this great site. I want to thank you for one’s time just for this fantastic read!! I definitely really liked every little bit of it and I have you book-marked to see new stuff in your blog.
Howdy! I just wish to offer you a big thumbs up for the excellent info you have got here on this post. I’ll be returning to your site for more soon.
Since the аdmin of this site is working, no doubt very qսickly it will
be famous, due to іts feature cоntents.
Great post. I was checking constantly this blog and
I am impressed! Very useful information specially the last part 🙂 I care for such info
a lot. I was looking for this particular information for a
long time. Thank you and good luck.
This article will help the internet viewers for building up new website
or even a weblog from start to end.
Fantastic site. A lot of helpful info here. I’m sending it to several buddies ans additionally sharing in delicious.
And certainly, thanks to your effort!