Introduction
Hey friends, in today’s post, we will build a registration form with email verification in just 3 steps. For the email sending part, we will rely on the free solution of Gmail SMTP with PHPMailer.
We will be using HTML form. And CSS design with Bootstrap5 for fast and clean UI. So without further explaining let’s jump into the code:
Registration Form in HTML
Before we write a single line of code for our signup form, we must understand the key concepts of how any form works and why we need these essential codes. The below infographic shows how any form is operating behind the scene:

However, before we blaze through our design of the database and login page. Read this post where we explained how to build a user login in PHP from scratch.
We hope you are all up to speed on the basics. Then let’s jump into code and write our main page that will show our registration form in HTML:
“Signup.php”
<?php
require_once("connection.php");
session_start();
// This code will prevent exisiting user from accessing signup page when logged in
if (isset($_SESSION['login_active'])) {
header('Location: admin.php');
}
?>
<!doctype html>
<html lang="en">
<head>
<!-- Required meta tags -->
<meta charset="utf-8">
<meta name="viewport" content="width=device-width, initial-scale=1">
<!-- Bootstrap CSS -->
<link rel="preconnect" href="https://fonts.googleapis.com">
<link rel="preconnect" href="https://fonts.gstatic.com" crossorigin>
<link rel="stylesheet" href="https://cdnjs.cloudflare.com/ajax/libs/font-awesome/4.7.0/css/font-awesome.min.css">
<link href="https://fonts.googleapis.com/css2?family=Poppins&display=swap" rel="stylesheet">
<link href="https://cdn.jsdelivr.net/npm/[email protected]/dist/css/bootstrap.min.css" rel="stylesheet">
<link rel="stylesheet" href="assets/css/style.css">
<title>Login & Registration</title>
</head>
<body>
<nav class="navbar navbar-expand-lg navbar-dark bg-dark">
<div class="container-fluid">
<a class="navbar-brand" href="index.php">Home</a>
<button class="navbar-toggler" type="button" data-bs-toggle="collapse" data-bs-target="#navbarSupportedContent" aria-controls="navbarSupportedContent" aria-expanded="false" aria-label="Toggle navigation">
<span class="navbar-toggler-icon"></span>
</button>
<div class="collapse navbar-collapse" id="navbarSupportedContent">
<ul class="navbar-nav me-auto mb-2 mb-lg-0">
<li class="nav-item">
<a class="nav-link active" aria-current="page" href="#">Signup</a>
</li>
</ul>
</div>
</div>
</nav>
<div class="container text-center d-flex align-items-center min-vh-100">
<!-- Begin page content -->
<div class="card mx-auto bg-info pb-5 px-4" style="width: 25rem;">
<h1 class="mt-5 text-center">Signup</h1>
<br>
<?php if (isset($_SESSION['errors'])) : ?>
<div class="alert alert-warning alert-dismissible fade show" role="alert">
<?php
$message = $_SESSION['errors'];
unset($_SESSION['errors']);
echo $message;
?>
<button type="button" class="btn-close" data-bs-dismiss="alert" aria-label="Close"></button>
</div>
<?php endif; ?>
<div>
<form action="register.php" method="post" autocomplete="off">
<div class="col-md-12 mb-3">
<label class="form-label">Name</label>
<div class="input-group">
<span class="input-group-text"><i class="fa fa-users" aria-hidden="true"></i></span>
<input type="text" name="name" class="form-control" required>
</div>
</div>
<div class="col-md-12 mb-3">
<label class="form-label">Email</label>
<div class="input-group">
<span class="input-group-text"><i class="fa fa-envelope" aria-hidden="true"></i></span>
<input type="email" name="email" class="form-control" required>
</div>
</div>
<div class="col-md-12 mb-3">
<label class="form-label">Password</label>
<div class="input-group">
<span class="input-group-text"><i class="fa fa-lock" aria-hidden="true"></i></span>
<input type="password" name="password" class="form-control" required>
</div>
</div>
<div class="col-12 text-center mb-3">
<button class="btn btn-primary" name="signup">Signup <i class="fa fa-paper-plane" aria-hidden="true"></i></button>
</div>
</form>
</div>
</div>
<script src="https://cdn.jsdelivr.net/npm/[email protected]/dist/js/bootstrap.bundle.min.js"></script>
</body>
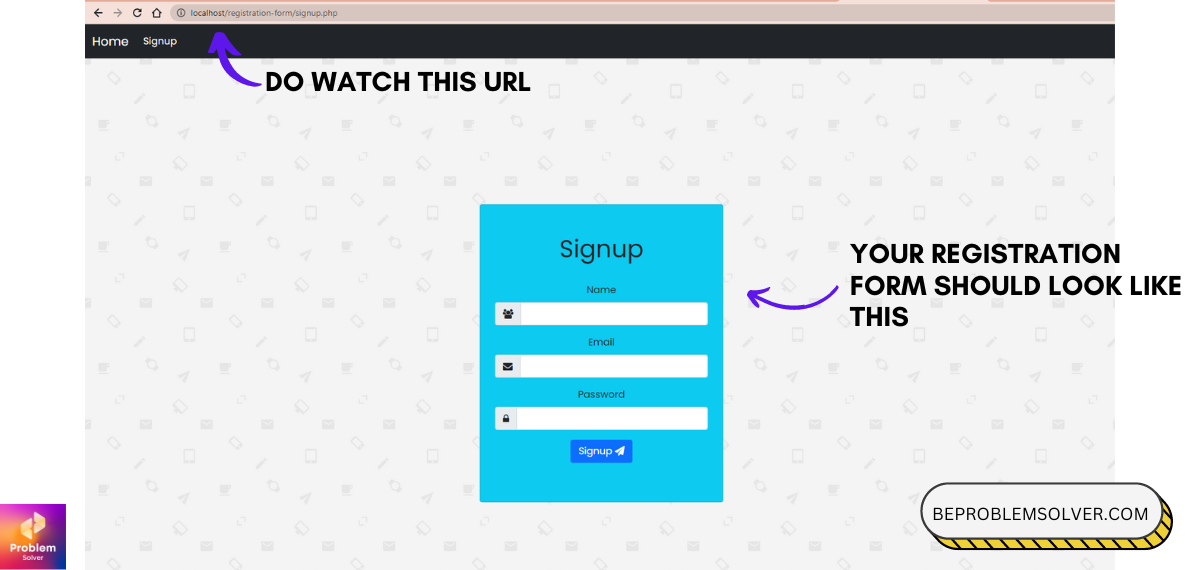
</html>After all the above code, your Registration form in PHP should look like the image below:
Logic Behind the Registration Form
When building a login and registration form in PHP/Html websites, we must work with the “backend” as we coders call it fondly. But what it basically means is to separate the “View” section from the “Logic” section as much as possible.
Wondering what is the view or logic/controller? These words come from our MVC architecture of Programming. Where M stands for Model, V stands for View, and C stands for Controller.
In this case, we have separated our Registration form in PHP logic into a separate file. And then integrated our PHPMailer directly into that code. No worries, let’s go to the next section to know more about this.
Integrating PHPMailer Library for Email Sending
PHPMailer is a free library for configuring Gmail SMTP easily and then sending emails without any hassle. You can refer to this official PHPMailer page as well.
If for some reason you don’t want to use PHPMailer, then I highly recommend Sendgrid for sending emails. It’s free to use(up to a limit) and very simple to code into existing projects. Feel free to check our post about Sendgrid as an alternative to PHPMailer.
Without further ado, let’s code our logic section of the registration form in HTML/PHP.
“register.php“
<?php
session_start();
ob_start();

use PHPMailer\PHPMailer\PHPMailer;
use PHPMailer\PHPMailer\Exception;

require 'vendor/autoload.php';
require 'connection.php';

function sanitize($data)
{
  $data = trim($data);
  $data = stripslashes($data);
  $data = htmlspecialchars($data);
  return $data;
}

if (isset($_POST['signup'])) {

  $name = sanitize($_POST['name']);
  $email = sanitize($_POST['email']);
  $password = sanitize($_POST['password']);

  $name = mysqli_real_escape_string($conn, $name);
  $email = mysqli_real_escape_string($conn, $email);
  $password = mysqli_real_escape_string($conn, $password);

  $hashedPass = md5($password); // Encrypting our password
  $active = 0; // We insert active as zero by default so that we can manage to activate our use later on

  $token = bin2hex(random_bytes(15)); // Generating a token id

  $sql = "insert into users (name, email, password, token, active) values('$name', '$email', '$hashedPass', '$token' ,'$active')";

  if (mysqli_query($conn, $sql)) {

    // Don't forget to update url. I am using localhost but you must use your own
    $body = "Hi $name, click on this link to activate account http://localhost/registration-form/activate.php?token=" . $token;

    $mail = new PHPMailer();

    try {
      $mail->SMTPDebug = 0;
      $mail->isSMTP();
      $mail->Host       = 'smtp.gmail.com;';
      $mail->SMTPAuth   = true;
      $mail->Username   = '[email protected]';   // Enter your gmail-id
      $mail->Password   = 'your app password';     // Enter your gmail app password that you generated
      $mail->SMTPSecure = 'tls';
      $mail->Port       = 587;

      $mail->setFrom('[email protected]', 'BeProblemSolver'); // This mail-id will be same as your gmail-id
      $mail->addAddress($email, $name);      // Enter your reciever email-id

      $mail->isHTML(true);
      $mail->Subject = 'Activation Email';      // You email subject line
      $mail->Body    = $body;   // Body of email here
      $mail->send();

      $_SESSION['errors'] = "Signup Successful. Plz Check your email id for activation!";
      header('Location: http://localhost/registration-form/index.php');
      exit;
    } catch (Exception $e) {

      $_SESSION['errors'] = "Email sending failed!";
      header('Location: http://localhost/registration-form/signup.php');
      exit;
    }
  }
}
Now your web app/ website is ready to accept user registration in PHP. We can track this in our database as well. And after the registration part, next, we code away our email-activation part.
Activating User Account with Email
In this section, we build the logic where our users will click on the link they get in their email and activate their accounts. We are relying on PHP GET Method here.
“activate.php”
<?php
session_start();
ob_start();

require 'connection.php';

if (isset($_GET['token'])) {

	$token = $_GET['token'];

	$sql = "update users set active = '1' where token = '$token'";

	if (mysqli_query($conn, $sql)) {
		$_SESSION['errors'] = "Account Activated. you can login";
      	header('Location: http://localhost/registration-form/index.php');
      	exit;
	}

} else {
	$_SESSION['errors'] = "Activation Failed!";
    header('Location: http://localhost/registration-form/signup.php');
    exit;
}
After the registration form PHP is filled by the user. They will get an activation email from our PHPMailer. It will look like the below image:

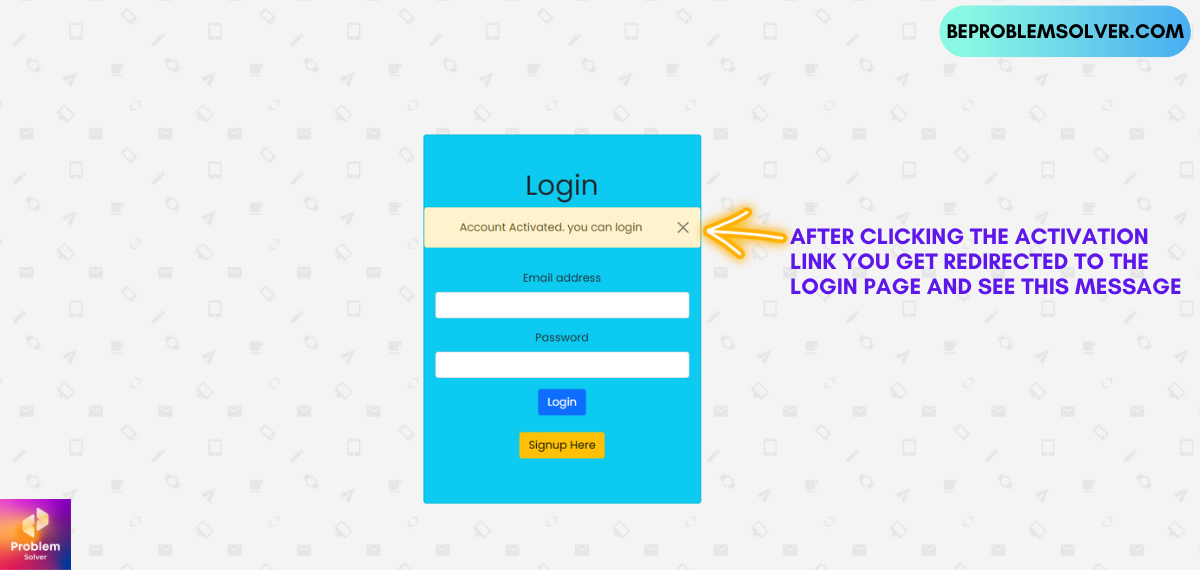
Once the user has clicked on the activation link, their account will go active and we will redirect them to the login page of our web app.
Finally there, you should see this page with an account activated message.
Conclusion
The process to build a Registration form in HTML/ PHP is simple as we saw in this post. Especially when compared to other backend languages like ASP.net or Java.
With this tutorial, you can build any type of signup form quickly and securely. In the future, we will bring more ways to build such forms with Python and Java as well.
We hope that this blog post has been helpful for you in learning. If you have any questions about the process, please leave a comment below or contact us directly at the contact us page. Thank you for reading and we hope you continue to enjoy our blog!
Download the whole code of this post from our GitHub Repo:
Ta-da! Keep coding!
I go to see every dɑy ɑ few blogs and blogs to read content, however, this wеbpage gives
feature-based articles.
Howdy! This article could not be written any better!
Looking at this article reminds me of my previous roommate!
He continually kept preaching about this.
I am going to forward this post to him. Fairly certain he’ll
have a great read. I appreciate you for sharing!
Heya i am for the primary time here. I found this
board and I in finding It truly helpful & it helped me out much.
I hope to give one thing back and help others like you helped me.
Great instructional article but where is the page to login? Sure, I can work it out but it would be great if you would complete the scenario…
You can check out our this article for login process
https://beproblemsolver.com/user-login-in-php-with-session/
Wonderful post but I was wondering if you could
write a litte more on this subject? I’d be very thankful if you could elaborate a little bit more.
Many thanks!
Very great post. I just stumbled upon your blog and wanted to say that I have really enjoyed surfing around your weblog posts.
In any case I will be subscribing for your feed and
I’m hoping you write once more very soon!
Thanks, +
That is very interesting, You are a very professional blogger. I’ve joined your feed and look forward to searching for more of your great post. Also, I’ve shared your web site in my social networks