Introduction
Howdy friends! Today we will learn how to build a CRUD CodeIgniter 4 using MySQL as a database and MaterializeCSS as a UI framework. And we will go through a complete details process.
Without any further talks, let’s jump into coding.
But before that, we must know what is Crud. And why it is an important part when learning any programming language or a framework like CodeIgniter.
What is CRUD?
CRUD is short for create, read, update, and delete.
This is a common database term used in web development! It describes the four most common types of database interactions.
Whenever we’re developing a web app or website whether it’s a CI4 app or building a simple PHP API system, it’s critical to understand CRUD operations. With CRUD we can change the records and fields in a database, through web apps.
Similarly, with CRUD basic understanding, you will be prepared to build complex apps and websites in the future.
CodeIgniter 4 Crud
Let’s start with our actual CodeIgniter 4 Crud coding part. We will break it down into the following processes to make it easier:
1. Installation of CodeIgniter: To work with CodeIgniter CRUD we must install CI4 with the composer. You can check how to install CodeIgniter in our previous post. It is very simple.
2. Design UI with MaterializeCSS: We at BeProblemSolver have been huge fans of BootStrap. But for change, we are going to code our UI in MaterialzeCSS. It is a very light and beautiful-looking CSS framework. Super easy to use as well.
3. Logic Building: Here we will actually code the logic section of our Crud Codeigniter 4 system. This section will work with the Controller and Model.
CRUD UI with Materialize CSS
Since we know that CodeIgniter is an MVC framework. We will keep our UI files in the View folder of the App Section. We have also separated the header and footer into different files. See the below image:

Our view files have some common files included in them like:
“header.php”
<!DOCTYPE html>
<html>

<head>
  <title>CodeIgniter Crud</title>
  <meta name="viewport" content="width=device-width, initial-scale=1.0" />
  <!--Import Google Icon Font-->
  <link href="https://fonts.googleapis.com/icon?family=Material+Icons" rel="stylesheet">
  <link href="https://fonts.googleapis.com/css2?family=Quicksand&display=swap" rel="stylesheet">
  <!--Import materialize.css-->
  <link type="text/css" rel="stylesheet" href="<?php echo base_url('assets'); ?>/css/materialize.min.css" />
  <link type="text/css" rel="stylesheet" href="<?php echo base_url('assets'); ?>/css/style.css" />
</head>

<body>
  <!-- Navigation Bar -->
  <nav>
    <div class="nav-wrapper">
      <a href="<?php echo site_url(); ?>" class="brand-logo">CodeIgniter CRUD</a>
      <ul id="nav-mobile" class="right hide-on-med-and-down">
        <li><a href="sass.html">Sass</a></li>
        <li><a href="badges.html">Components</a></li>
        <li><a href="collapsible.html">JavaScript</a></li>
      </ul>
    </div>
  </nav>
  <!-- Navigation Bar -->

  <!-- Session -->
  <?php if (isset($_SESSION['msg'])) : ?>
    <div class="alert white-text"><?= $_SESSION['msg']; ?> <button id="closebtn" type="button" class="btn"><i class="material-icons">close</i></button></div>
  <?php endif; ?>
<!-- Session -->“footer.php”
  <!-- Footer -->
  <footer class="page-footer">
    <div class="footer-copyright">
      <div class="container">
        © 2022 CodeIgniter 4 Crud <a class="grey-text text-lighten-4 right" href="https://beproblemsolver.com">Coded by BeProblemSolver</a>
      </div>
    </div>
  </footer>
  <!-- Footer -->

  <!--JavaScript-->
  <script src="<?php echo base_url('assets'); ?>/js/materialize.min.js"></script>
  <script src="<?php echo base_url('assets'); ?>/js/custom.js"></script>
</body>

</html>“home.php”: main UI file which shows us all our product details.
<?php include("includes/header.php"); ?>
<main>
<div class="container">
<div class="row">
<div class="col s12">
<a class="waves-effect waves-light blue btn add-pd-btn" href="<?php echo base_url("add"); ?>"><i class="material-icons right">add_circle</i>Add Product</a>
</div>
</div>
<div class="row">
<div class="col s12">
<h3>Product Data</h3>
<table class="striped">
<thead>
<tr>
<th>S.no.</th>
<th>Item Name</th>
<th>Item Price</th>
<th>Category</th>
<th colspan="2">Action</th>
</tr>
</thead>
<tbody>
<?php
$i = 1;
foreach ($prodata as $record) : ?>
<tr>
<td><?= $i; ?>.</td>
<td><?= $record->product_name; ?></td>
<td><?= $record->product_price; ?></td>
<td><?= $record->product_category; ?></td>
<td><a href="<?php echo base_url("update/"); ?>/<?= $record->id; ?>" class="waves-effect waves-light btn green"><i class="material-icons">loop</i></a></td>
<td><a href="<?php echo base_url("delete/"); ?>/<?= $record->id; ?>" class="waves-effect waves-light btn red"><i class="material-icons">delete_forever</i></a></td>
</tr>
<?php
$i++;
endforeach; ?>
</tbody>
</table>
</div>
</div>
</div>
</main>
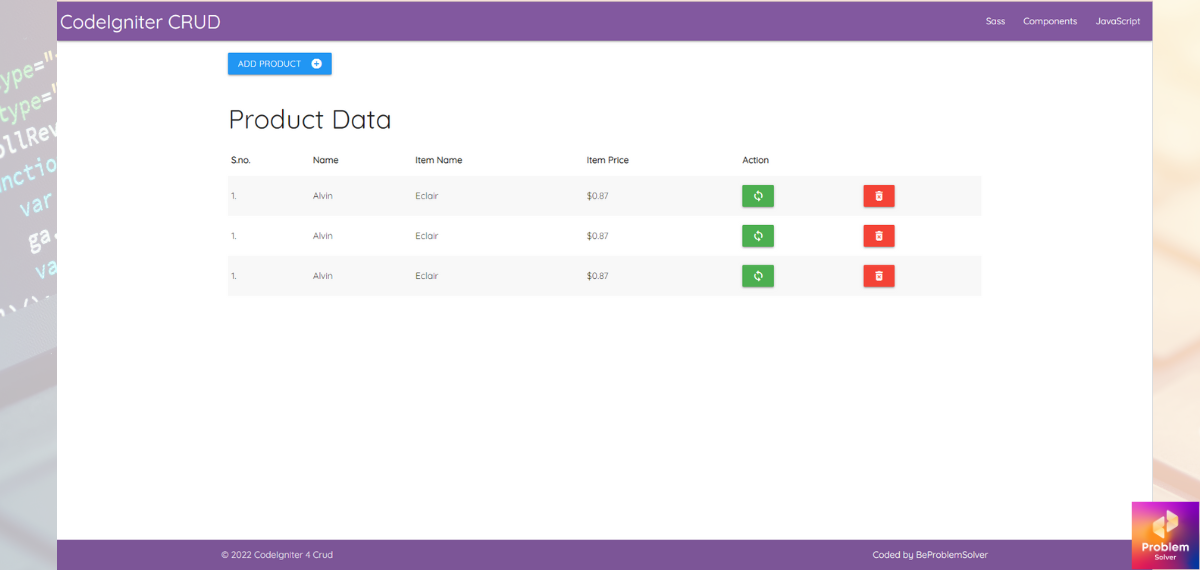
<?php include("includes/footer.php"); ?>After coding all our VIEW files, our UI would look like this:
We are done with our main UI file “home.php“. But we still need to code the rest of the VIEW files:
“addproduct.php“: this file contains a form that allows us to add new products.
<?php include("includes/header.php"); ?>
<main>
  <div class="container">
    <div class="row">
      <div class="col s12">
        <h3>Add New Product Data</h3>
      </div>
    </div>

    <div class="row">
      <div class="col s12 m6">
        <div class="card">
          <div class="card-content">

            <div class="row">
              <!-- Form -->
              <form class="col s12" action="<?php echo base_url("home/addproduct"); ?>" method="post">
                <div class="row">
                  <div class="input-field col s12">
                    <i class="material-icons prefix">create</i>
                    <input id="icon_prefix" type="text" class="validate" name="product_name" required>
                    <label for="icon_prefix">Product Name</label>
                  </div>

                  <div class="input-field col s12">
                    <i class="material-icons prefix">attach_money</i>
                    <input id="icon_telephone" type="number" class="validate" name="product_price" required>
                    <label for="icon_telephone">Price</label>
                  </div>

                  <div class="input-field col s12">
                    <i class="material-icons prefix">build</i>
                    <input id="icon_category" type="text" class="validate" name="product_category" required>
                    <label for="icon_category">Category</label>
                  </div>
                </div>

                <button class="btn waves-effect waves-light green" type="submit" name="submit">Submit
                  <i class="material-icons right">send</i>
                </button>
              </form>

            </div>

          </div>
        </div>
      </div>
    </div>

  </div>

</main>
<?php include("includes/footer.php"); ?>“updateproduct.php”: with this file, we can update the details of existing products.
<?php include("includes/header.php"); ?>
<main>
<div class="container">
<div class="row">
<div class="col s12">
<h3>Update Product</h3>
</div>
</div>
<div class="row">
<div class="col s12 m6">
<div class="card">
<div class="card-content">
<div class="row">
<!-- Form -->
<?php foreach($product as $record): ?>
<form class="col s12" action="<?php echo base_url("home/updating"); ?>" method="post">
<div class="row">
<div class="input-field col s12">
<i class="material-icons prefix">create</i>
<input id="icon_prefix" type="text" class="validate" name="product_name" required value="<?=$record->product_name; ?>">
<label for="icon_prefix">Product Name</label>
</div>
<div class="input-field col s12">
<i class="material-icons prefix">attach_money</i>
<input id="icon_telephone" type="number" class="validate" name="product_price" required value="<?=$record->product_price; ?>">
<label for="icon_telephone">Price</label>
</div>
<div class="input-field col s12">
<i class="material-icons prefix">build</i>
<input id="icon_category" type="text" class="validate" name="product_category" required value="<?=$record->product_category; ?>">
<label for="icon_category">Category</label>
</div>
<input type="hidden" name="upid" value="<?=$record->id; ?>">
</div>
<button class="btn waves-effect waves-light green" type="submit" name="update">Update
<i class="material-icons right">send</i>
</button>
</form>
<?php endforeach; ?>
</div>
</div>
</div>
</div>
</div>
</div>
</main>
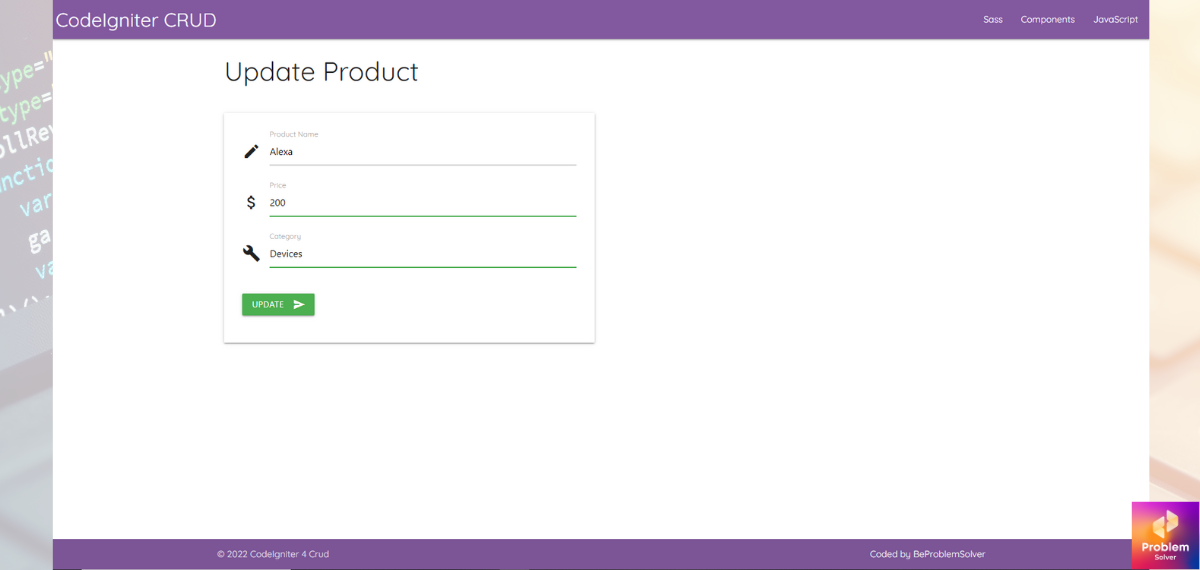
<?php include("includes/footer.php"); ?>Look at the below image, this is how your Update Product UI page should look like by now:
Now that we are done with the View part let’s move on to the logic part of the Codeigniter crud. Also if you want to use Image Scroll on hover in the webpage then check out this post.
Controller and Model of CodeIgniter 4 Crud
The Controller and Model are the backends part of our Crud CodeIgniter 4 app. If you are working with Crud CodeIgniter3, these parts will be easy for you. Because its structure hasn’t changed from CI3 to CI4.
Below is our Controller file:
“Home.php“
<?php
namespace App\Controllers;
use App\Models\Productmodal;

class Home extends BaseController
{
    public $registermodal;

    public function __construct()
    {
        $this->productmodal = new Productmodal();
    }

    // Loading Homepage with products
    public function index()
    {
        $data['prodata'] = $this->productmodal->getData();

        return view('home', $data);
    }

    // Loading view of Add Product Page
    public function add()
    {
        return view('addproduct');
    }

    // Logic Submitting a product
    public function addproduct()
    {
        $request = \Config\Services::request();

        $insData = [
            'product_name' => $request->getVar('product_name'),
            'product_price' => $request->getVar('product_price'),
            'product_category' => $request->getVar('product_category')
        ];

        if ($this->productmodal->insertData($insData)) {
            $this->session->setTempdata('msg', 'Product Added Successfully', 300);
            return redirect()->to('add');
        } else {

            $this->session->setTempdata('msg', 'Product Addition Failed', 300);
            return redirect()->to('add');
        }
    }

    // Loading a Update Product page with product details
    public function updateproduct($id)
    {
        $data['product'] = $this->productmodal->singleData($id);
        return view('updateproduct', $data);
    }

    // Updating product
    public function updating()
    {
        $request = \Config\Services::request();

        $upData = [
            'product_name' => $request->getVar('product_name'),
            'product_price' => $request->getVar('product_price'),
            'product_category' => $request->getVar('product_category')
        ];

        $upid = $request->getVar('upid');

        if ($this->productmodal->updateData($upid, $upData)) {
            $this->session->setTempdata('msg', 'Product Updated Successfully', 5);
            return redirect()->to('/');
        } else {
            $this->session->setTempdata('msg', 'Product Updation Failed', 5);
            return redirect()->to('/');
        }
    }


    // Delete a Product
    public function deleteproduct($id)
    {
        if ($this->productmodal->deleteData($id)) {
            $this->session->setTempdata('msg', 'Product Removed Successfully', 5);
            return redirect()->to('/');
        } else {
            $this->session->setTempdata('msg', 'Product Removal Failed', 5);
            return redirect()->to('/');
        }
    }
}
We are done with our UI code in the VIEW section and Controller part. For the final piece of the puzzle, we only need to connect our app with the database.
Next up is our Model which interacts with our MySQL database “cicrud“. This model’s file name is:
“Productmodal.php“
<?php
namespace App\Models;
use CodeIgniter\Model;

class Productmodal extends Model
{
  public $db;

  public function __construct()
  {
    $this->db = \Config\Database::connect();
  }

  // Fetching All Data
  public function getData()
  {
    $builder = $this->db->table('products');
    $query   = $builder->get();

    return $query->getResult();
  }

  // Inserting Data
  public function insertData($data)
  {
    $builder = $this->db->table('products');
    $result = $builder->insert($data);
    return $result;
  }

  // Fetching Single Product Data
  public function singleData($id)
  {
    $builder = $this->db->table('products')->where('id', $id);
    $query = $builder->get();

    return $query->getResult();
  }

  // Updating Product Data based on its id
  public function updateData($id, $data)
  {
    $builder = $this->db->table('products')->where('id', $id);
    $result = $builder->update($data);

    return $result;
  }

  // Deleting Data
  public function deleteData($id)
  {
    $builder = $this->db->table('products')->where('id', $id);
    $result = $builder->delete();

    return $result;
  }
}
Database of CRUD CodeIgniter 4
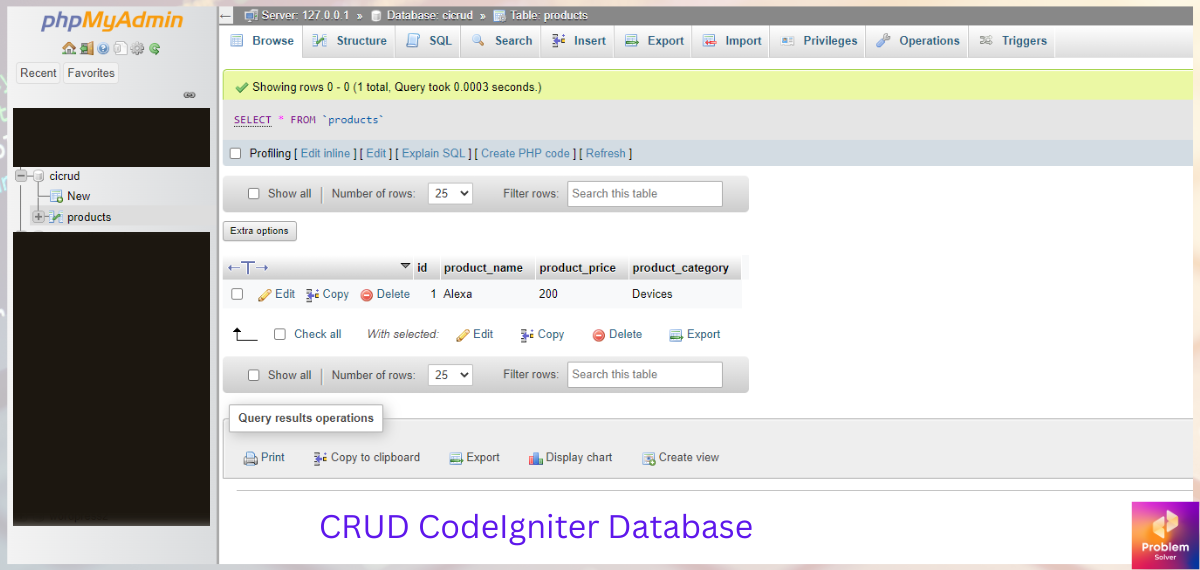
For the database of our CRUD CodeIgniter 4 app, we are using MySQL, and building and linking it is pretty similar to any other PHP application. Check our post on Login Systems built in PHP. Here we have explained how to create and link a database.
Congrats! We have completed the CRUD CodeIgniter app. You can deploy this app on any PHP-based server with no issues. And finally, feel free to download the whole code from our Github Repo in the below link:
Conclusion
That’s it and congrats on reaching the end of this tutorial!
We hope you have enjoyed today’s post on Crud CodeIgniter 4 with MySQL and MaterializeCSS. If you are interested in more tutorials like this one, please let us know in the comments below or by mail directly.
Also, if you want to learn about integrating an email functionality with PHPMailer and free Gmail SMTP check out our post. We have a wide selection of tutorials that will teach you how to Thanks for reading and have a great day!
Ta-da! And keep coding!
Piece of writing writing is also a excitement, if you know
after that you can write or else it is complex to write.
hello there and thank you for your information – I’ve definitely picked up anything new from right here.
I did however expertise a few technical points using this website, since I experienced to reload the web site lots of times previous to I could get it to load correctly.
I had been wondering if your web host is OK? Not that I’m complaining, but slow loading instances times will very frequently affect your placement in google and can damage your high quality score if advertising and marketing with Adwords.
Well I am adding this RSS to my e-mail and can look out for much
more of your respective fascinating content. Make sure you update
this again very soon.
Keep up the fantastic work and continue to inspire us all!